Table of Contents:
- Background
- Why Skaffold
- How Skaffold works
- Prerequisite
- Skaffold with Java
- Skaffold with Go
- Conclusion
Background
This is a step-by-step guide to building an application using Skaffold. From building and running on a local machine to releasing as Kubernetes YAML using CI. Gitlab will be used as an image registry and CI/CD pipeline.
Why Skaffold
Skaffold is a command line tool developed by Google. It helps developers build and deploy applications to Kubernetes easily and rapidly.
The good things:
- It supports many languages.
- It allows us to develop and deploy the change to Kubernetes quickly with the watch feature.
- It lets you test with other APIs on the cluster easily.
The not so good things:
- You need a working Kubernetes that can deploy from a local machine. You can use local Kubernetes such as Minikube but this could make it less beneficial.
- It needs an image registry to build on the local machine.
My use case is to develop an application that calls to another application on the Kubernetes cluster, so I can test my application in the real environment very quickly.
How Skaffold works
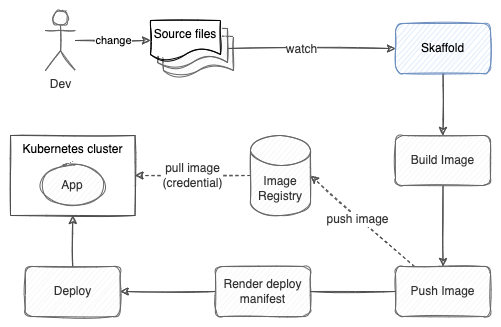 Skaffold development workflow
The developer makes some changes on the local machine and triggers Skaffold to build and deploy the changes through the stages below.
Skaffold stages:
- build - build image and push to designate registry
- render - output Kubernetes deployment artifacts
- deploy - deploy Kubernetes artifacts to the target server
Prerequisite
Things you will need before you can follow this tutorial:
- Skaffold CLI installed. (See instructions here)
- A working Kubernetes cluster and access via kubectl. (See local virtual machine option here).
- Gitlab account and repository. One repository per application.
- Docker CLI on the local machine (Docker desktop or Colima is ok).
Docker login to GitLab container registry.
Skaffold needs to push and pull images from the registry so we need to create an access token and login on to the local machine.
- Create GitLab Access Token.
- Open Gitlab menu Access Tokens
- Create access token with permissions to push/pull image registry
 Token permissions
- Login using docker on the local machine.
docker login registry.gitlab.com # Username: <your gitlab username> # Password: <your access token> - [Only for private repository] Createpull image secret from docker config.
kubectl create secret generic regcred \
 --from-file=.dockerconfigjson=$HOME/.docker/config.json \
 --type=kubernetes.io/dockerconfigjson
 # output: secret/regcred created
Skaffold with Java
In this tutorial, we will create a simple Java Spring boot application, test it, and deploy it on the local machine. Then, create GitLab CI that creates the Kubernetes YAML file as a release asset.
1. Clone the sample project as a starting point
git clone -b start [email protected]:pongsatt/skaffold_java.git
It’s a simple Spring boot web application.
Run the app from your favorite IDE or command line.
./mvnw spring-boot:run
# or mvnw.cmd spring-boot:run for windows
Open http://localhost:8080 and you should see.
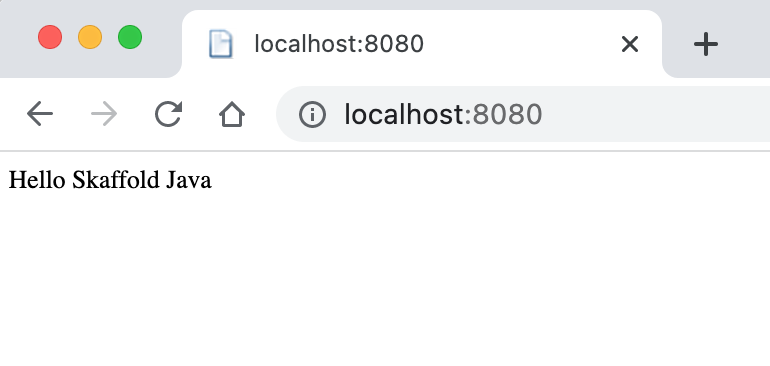 Spring boot app web
2. Add k8s deployment definition
Next, we will add the Kubernetes deployment definition. This could be a plain YAML, Helm, or Kustomize. We will use a plain YAML in this example.
# k8s/app.yaml

apiVersion: v1
kind: Service
metadata:
  name: skaffold-java
spec:
  ports:
    - port: 8080
      name: http
  type: NodePort
  selector:
    app: skaffold-java
---
apiVersion: apps/v1
kind: Deployment
metadata:
  name: skaffold-java
  labels:
    app: skaffold-java
spec:
  selector:
    matchLabels:
      app: skaffold-java
  template:
    metadata:
      labels:
        app: skaffold-java
    spec:
      imagePullSecrets: # only need for private image registry
        - name: regcred # from secret creating step
      containers:
        - name: skaffold-java
          image: skaffold-java
          ports:
            - containerPort: 8080
This k8s/app.yaml file contains normal Deployment and Service definition except the container’s image which will be replaced with the actual image in the render stage.
3. Add Skaffold configuration
For Skaffold CLI to know how to work with our project, we need a Skaffold YAML configuration file.
# skaffold.yaml
apiVersion: skaffold/v2beta28
kind: Config
build:
  artifacts:
  - image: skaffold-java
    jib: {} # build docker image using project's jib plugin
This is the simplest version of Skaffold for Java. It tells Skaffold to build an image using the project’s Maven or Gradle plugin which will be added in the next step.
4. Add the Jib plugin to the project
Jib plugin is a library for Maven or Gradle to help Skaffold build Java application images.
Since we use Maven in our example, add this plugin snippet to pom.xml.
<!-- pom.xml -->
...
<plugins>
            ...
    <!-- to support skaffold java -->
    <plugin>
        <groupId>com.google.cloud.tools</groupId>
        <artifactId>jib-maven-plugin</artifactId>
        <version>3.2.0</version>
    </plugin>
</plugins>
You can configure how to build your image in this plugin document.
5. Start development using Skaffold
We have everything we need to start our development. First, set the default repo env so Skaffold knows where to push or pull the image. We will use the GitLab repository’s container registry.
export SKAFFOLD_DEFAULT_REPO=registry.gitlab.com/<your project name>/skaffold_java
Replace registry URL to your gitlab’s project container registry. You can also find the URL from your project “Container Registry” menu.
Run Skaffold development command.
skaffold dev
Skaffold will start watching the project’s files and when there is a change, it will build and deploy our application to the current Kubernetes cluster.
If things are going as planned, you should see the Spring boot application on the console like this.
...
Waiting for deployments to stabilize...
 - deployment/skaffold-java is ready.
Deployments stabilized in 3.498 seconds
Press Ctrl+C to exit
Watching for changes...
[skaffold-java]
[skaffold-java]   .   ____          _            __ _ _
[skaffold-java]  /\\ / ___'_ __ _ _(_)_ __  __ _ \ \ \ \
[skaffold-java] ( ( )\___ | '_ | '_| | '_ \/ _` | \ \ \ \
[skaffold-java]  \\/  ___)| |_)| | | | | || (_| |  ) ) ) )
[skaffold-java]   '  |____| .__|_| |_|_| |_\__, | / / / /
[skaffold-java]  =========|_|==============|___/=/_/_/_/
[skaffold-java]  :: Spring Boot ::        (v2.0.5.RELEASE)
[skaffold-java]
...
Check if our application runs on the cluster.
kubectl get deployment/skaffold-java
You should see something like this.
NAME            READY   UP-TO-DATE   AVAILABLE   AGE
skaffold-java   1/1     1            1           3m1s
To access the application from the browser using port-forwarding.
kubectl port-forward svc/skaffold-java 8080:8080
# open http://localhost:8080
This sample app also support NodePort so you can access the application using NodePort.
6. Create GitLab CI definition
Now, we got our application running on the local machine. In this step, we will integrate Skaffold with the Gitlab CI pipeline. In this example, the pipeline will build and render Kubernetes YAML as a release asset so people can deploy our application from anywhere.
Create file .gitlab-ci.yml at the root of the project.
# .gitlab-ci.yml
stages:
  - build
  - release

build-job:
  stage: build
  image: gcr.io/k8s-skaffold/skaffold:v1.38.0
  rules:
    - if: $CI_COMMIT_TAG
  variables:
    SKAFFOLD_DEFAULT_REPO: $CI_REGISTRY_IMAGE
  script:
    - docker login -u $CI_REGISTRY_USER -p $CI_JOB_TOKEN $CI_REGISTRY
    - skaffold build --tag $CI_COMMIT_TAG --file-output build.json
    - skaffold render --offline=true -a build.json -o app.yaml
  artifacts:
    paths:
      - app.yaml

release_job:
  stage: release
  image: registry.gitlab.com/gitlab-org/release-cli:latest
  rules:
    - if: $CI_COMMIT_TAG
  script:
    - echo "running release_job"
  artifacts:
    paths:
      - app.yaml
  release:
    name: "Release $CI_COMMIT_TAG"
    description: "Created using the release-cli"
    tag_name: "$CI_COMMIT_TAG"
    assets:
      links:
        - name: "k8s"
          url: "$CI_PROJECT_URL/-/jobs/$CI_JOB_ID/artifacts/raw/app.yaml"
          filepath: "/app.yaml"
          link_type: "other"
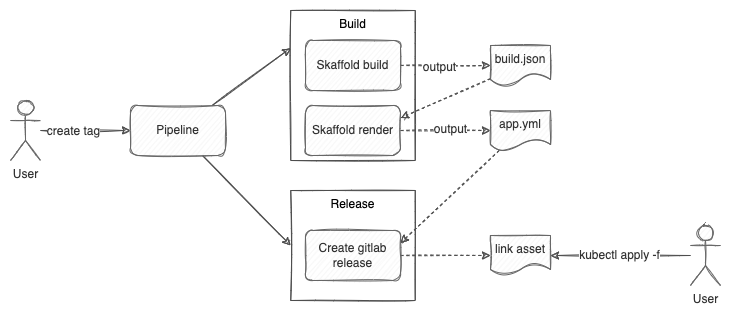 Gitlab pipeline
Explanation. There 2 stages, build and release. Both of them are triggered when a tag is created.
- build
- Build the image and push it to the project’s registry, then output a build JSON file
- Render Kubernetes YAML using information from the build JSON file and produces app.yaml as an installable Kubernetes artifact
- release
- Create a Gitlab release that contains a link to app.yaml (Example: https://gitlab.com/pongsatt/skaffold_java/-/releases/1.0/downloads/app.yaml). This link can be used as an input of
kubectl apply -f https://gitlab.com/pongsatt/skaffold_java/-/releases/1.0/downloads/app.yaml
- Create a Gitlab release that contains a link to app.yaml (Example: https://gitlab.com/pongsatt/skaffold_java/-/releases/1.0/downloads/app.yaml). This link can be used as an input of
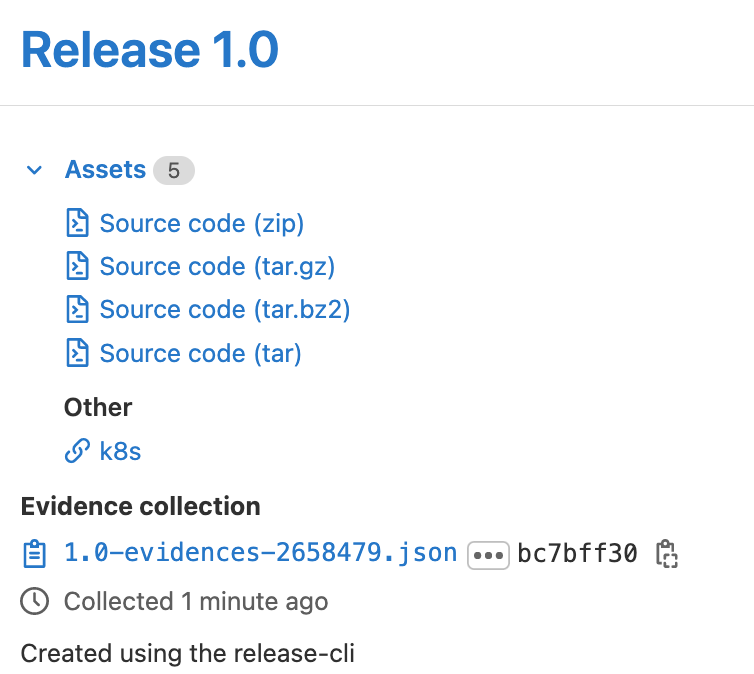 Gitlab release page
Push the complete code to your repository and create a tag to see the result.
Skaffold with Go
Building Go application using Skaffold is a little bit different. Follow the below steps to build and release the Go application to GitLab.
1. Clone the sample project
git clone -b start [email protected]:pongsatt/skaffold_go.git
This is an API application using the Go Echo library.
Start the app using your favorite IDE or command line.
go run main.go
Open http://localhost:8080 and you should see.
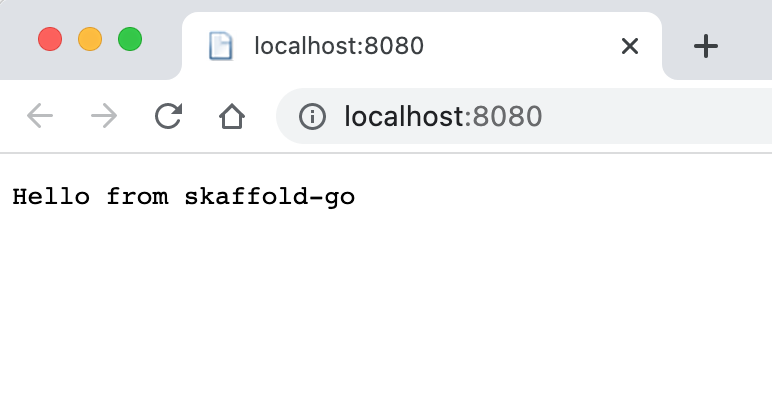 Go application result
2. Add k8s deployment definition
Adding Kubernetes YAML as a deployment template.
# k8s/app.yaml

apiVersion: v1
kind: Service
metadata:
  name: skaffold-go
spec:
  ports:
  - port: 8080
    name: http
  type: NodePort
  selector:
    app: skaffold-go
---
apiVersion: apps/v1
kind: Deployment
metadata:
  name: skaffold-go
  labels:
    app: skaffold-go
spec:
  selector:
    matchLabels:
      app: skaffold-go
  template:
    metadata:
      labels:
        app: skaffold-go
    spec:
      containers:
      - name: skaffold-go
        image: skaffold-go
        ports:
          - containerPort: 8080
3. Add Dockerfile
This is different from the java application. Java uses the Jib library so it doesn’t need a Dockerfile. For Go, the image is built by docker, so it needs a Dockerfile.
FROM golang:1.16-alpine as builder

ENV GO111MODULE=on \
    CGO_ENABLED=0 \
    GOOS=linux \
    GOARCH=amd64

WORKDIR /src

COPY go.* ./
RUN go mod download

COPY *.go ./

# `skaffold debug` sets SKAFFOLD_GO_GCFLAGS to disable compiler optimizations
ARG SKAFFOLD_GO_GCFLAGS
RUN go build -gcflags="${SKAFFOLD_GO_GCFLAGS}" -o /bin/app .

FROM scratch

# Define GOTRACEBACK to mark this container as using the Go language runtime
# for `skaffold debug` (https://skaffold.dev/docs/workflows/debug/).
ENV GOTRACEBACK=single
COPY --from=builder /bin/app /bin/app
CMD ["/bin/app"]
This is a 2-stages build. In the first stage build an executable file and copied to the bare minimum image in the 2nd stage. For a faster build but larger and less secure image, use one stage build Dockerfile below.
FROM golang:1.16-alpine

ENV GO111MODULE=on \
    CGO_ENABLED=0 \
    GOOS=linux \
    GOARCH=amd64

WORKDIR /src

COPY go.* ./
RUN go mod download

COPY *.go ./

# `skaffold debug` sets SKAFFOLD_GO_GCFLAGS to disable compiler optimizations
ARG SKAFFOLD_GO_GCFLAGS
RUN go build -gcflags="${SKAFFOLD_GO_GCFLAGS}" -o /bin/app .

CMD ["/bin/app"]
4. Add Skaffold configuration
A simple Skaffold configuration for Go looks like this.
# skaffold.yaml
apiVersion: skaffold/v2beta28
kind: Config
build:
  artifacts:
  - image: skaffold-go
deploy:
  kubectl:
    manifests:
      - k8s/*
This config shows that we will deploy our application using kubectl and k8s/ folder as a deployment template.
5. Start development using Skaffold
We are ready to start the development.
Setting the default repo env so Skaffold knows to push or pull images from our GitLab’s registry
export SKAFFOLD_DEFAULT_REPO=registry.gitlab.com/<your project name>/skaffold_go
If you use Colima or something else rather than standard docker, make sure to set a correct docker host.
Colima example.
export DOCKER_HOST=unix:///$HOME/.colima/docker.sock
Run Skaffold development command.
skaffold dev
You should see the Echo output on the console.
...
Starting deploy...
 - service/skaffold-go created
 - deployment.apps/skaffold-go created
Waiting for deployments to stabilize...
 - deployment/skaffold-go is ready.
Deployments stabilized in 2.833 seconds
Press Ctrl+C to exit
Watching for changes...
[skaffold-go]
[skaffold-go]    ____    __
[skaffold-go]   / __/___/ /  ___
[skaffold-go]  / _// __/ _ \/ _ \
[skaffold-go] /___/\__/_//_/\___/ v4.7.2
[skaffold-go] High performance, minimalist Go web framework
[skaffold-go] https://echo.labstack.com
[skaffold-go] ____________________________________O/_______
[skaffold-go]                                     O\
[skaffold-go] ⇨ http server started on [::]:8080
Check if our application runs on the cluster.
kubectl get deployment/skaffold-go
To access the application from the browser using port-forwarding.
kubectl port-forward svc/skaffold-go 8080:8080
# open http://localhost:8080
This sample app also support NodePort so you can access the application using NodePort.
6. Create Gitlab CI definition
# .gitlab-ci.yml
stages:
  - build
  - release

services:
  - docker:dind # use docker-in-docker service so docker cli is available

variables:
  DOCKER_DRIVER: overlay2
  DOCKER_TLS_CERTDIR: ""
  DOCKER_HOST: tcp://docker:2375 # docker socket on docker-in-docker service
  SKAFFOLD_DEFAULT_REPO: $CI_REGISTRY_IMAGE

build-job:
  stage: build
  image: gcr.io/k8s-skaffold/skaffold:v1.38.0
  rules:
    - if: $CI_COMMIT_TAG
  script:
    - docker login -u $CI_REGISTRY_USER -p $CI_JOB_TOKEN $CI_REGISTRY
    - skaffold build --tag $CI_COMMIT_TAG --file-output build.json
    - skaffold render --offline=true -a build.json -o app.yaml
  artifacts:
    paths:
      - app.yaml

release_job:
  stage: release
  image: registry.gitlab.com/gitlab-org/release-cli:latest
  rules:
    - if: $CI_COMMIT_TAG
  script:
    - echo "running release_job"
  artifacts:
    paths:
      - app.yaml
  release:
    name: "Release $CI_COMMIT_TAG"
    description: "Created using the release-cli"
    tag_name: "$CI_COMMIT_TAG"
    assets:
      links:
        - name: "k8s"
          url: "$CI_PROJECT_URL/-/jobs/$CI_JOB_ID/artifacts/raw/app.yaml"
          filepath: "/app.yaml"
          link_type: "other"
Go Gitlab-ci is different from Java because it needs docker CLI to build an image on the pipeline’s runner. So we need to add docker context to the build stage (using DIND service). The rest is the same as the Java pipeline.
Push the complete code to your repository and create a tag to see the result.
Conclusion
This tutorial is a guide to using Skaffold for Java and Go. You also learn to configure the Gitlab registry and pipeline and then integrate it with Skaffold. This is a basic understanding to use Skaffold. In the real world, helm or Kustomize can be used instead of kubectl to support more complex use cases. Moreover, the end state of the pipeline could be deployed to the cluster instead of releasing a YAML file.
Happy building software!!