
This post is part of “Authorization in microservices with Open Policy Agent, NodeJs, and ReactJs” series.
- Introduction
- Backend
- Frontend (this post)
Table of Contents:
- Background
- Prerequisite
- Introduce the demo application
- Prepare WebAssembly bundle
- Create a ReactJs project
- Create an OPA hook
- Create the UI
- Conclusion
Background
In the previous post, we built a NodeJs backend that protects its endpoint by checking the authorization against OPA api server.
In this post, we will explore another important type of software - Frontend.
Normally, the authorization logic is shared between backend and frontend. In frontend, we use authorization to decide how to show the UI to the user for a good user experience. In backend, we need to check the same authorization to make sure that no one can by pass it.
Although the authorization logic is shared, the code itself is hardly shared due to the fact that the frontend and backend code are separate. This causes the duplication of logic that we need to sync between code bases.
This demo, I will show you how to reuse the same authorization logic as backend and how to run it locally on the browser using WebAssembly.
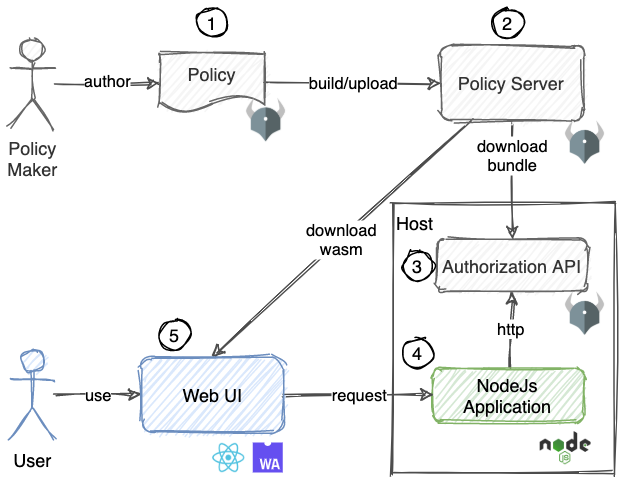 Demo application components
This post will cover no. 5 in above picture.
Prerequisite
This demo requires these tools to be installed in your machine.
- NodeJs + NPM
Introduce the demo application
This demo is a RejectJs application. When a user opens the UI, it will download OPA policy as WebAssembly’s wasm and data.json file from the bundle server. Then display buttons to the user, when clicked, the authorization is evaluated using the input shown on the UI and the result will show on the screen.
Prepare WebAssembly bundle
In the first post, we built a bundle the policy as tar file, this file is used by the backend. On the other hand, for the frontend, we need to build wasm file.
Go back to the bundle server project and run this command on the folder that contains policies files. (See first post)
mkdir -p public # make sure that the output folder exists

# build wasm bundle with default entry point to query "permission/allow"
opa build -t wasm -e permission/allow -o public/wasm.tar.gz -b .

# extract wasm bundle
tar -xf public/wasm.tar.gz -C public --exclude=.manifest

# Output files
# public/policy.wasm
# public/data.json
Note
The folder public/ is served by nginx http server we run in the first post.
Create a ReactJs project
We will create a simple ReactJs project using createReactApp.
npx create-react-app opa-ui
cd opa-ui
npm start
Create an OPA hook
We will use a react hook to download the files from the bundle server and provide a method to evaluate the authorization.
// src/useOpaWasm.js
import { loadPolicy } from "@open-policy-agent/opa-wasm";
import { useEffect, useState } from "react";

export default function useOpaWasm(baseUrl) {
  const [policy, setPolicy] = useState();
  const [loading, setLoading] = useState(false);
  const [error, setError] = useState();

  useEffect(() => {
    const load = async () => {
      const policyWasmResp = await fetch(`${baseUrl}/policy.wasm`, {
        cache: "no-cache",
      });
      const policyWasm = await policyWasmResp.arrayBuffer();
      const policy = await loadPolicy(policyWasm);

      const dataResp = await fetch(`${baseUrl}/data.json`, {
        cache: "no-cache",
      });
      const data = await dataResp.json();
      policy.setData(data);

      setPolicy(policy);
    };
    setLoading(true);
    load()
      .catch((err) => setError(err))
      .finally(() => setLoading(false));
  }, [baseUrl]);

  return { policy, loading, error };
}
Note
This hook rely on library “@open-policy-agent/opa-wasm” to load and evaluate OPA wasm file. It uses “fetch” api to download policy.wasm and data.json files from the bundle server. “no-cache” means it will try to download the latest file in case that the rules might be updated.
Create the UI
We will create a UI that use the hook we’ve created.
// src/App.js
import { useState } from 'react';
import './App.css';
import useOpaWasm from './useOpaWasm';

function App() {
  // load wasm from the bundle server
  const { policy } = useOpaWasm("http://localhost:8182");

  // store evaluation result
  const [info, setInfo] = useState({ text: '', color: '', input: {} });

  // check permission against requested input
  const check = (role, action, object) => {
    const input = {
      subject: {
        roles: [role],
      },
      action,
      object,
    };
    const result = policy.evaluate(input);

    const allow = result[0].result;
    if (allow) {
      setInfo({ text: `As ${role} you can ${action} ${object}`, color: 'green', input });
    } else {
      setInfo({ text: `As ${role} you cannot ${action} ${object}`, color: 'red', input });
    }
  }

  return (
    <div className="App">
      <div style={{ color: info.color }}>{info.text}</div>
      <div><button onClick={() => check('admin', 'create', 'order')}>Can Admin create order?</button></div>
      <div><button onClick={() => check('admin', 'read', 'order')}>Can Admin read order?</button></div>
      <div><button onClick={() => check('user', 'create', 'order')}>Can User create order?</button></div>
      <div><button onClick={() => check('user', 'read', 'order')}>Can User read order?</button></div>
      <pre style={{textAlign: 'left'}}>input: {JSON.stringify(info.input, null, 4)}</pre>
    </div>
  );
}

export default App;
Note
When the button is clicked, it will call “check” method which will evaluate the authorization policy with the given input (user role, request action, request object). The authorization logic is based on the first post.
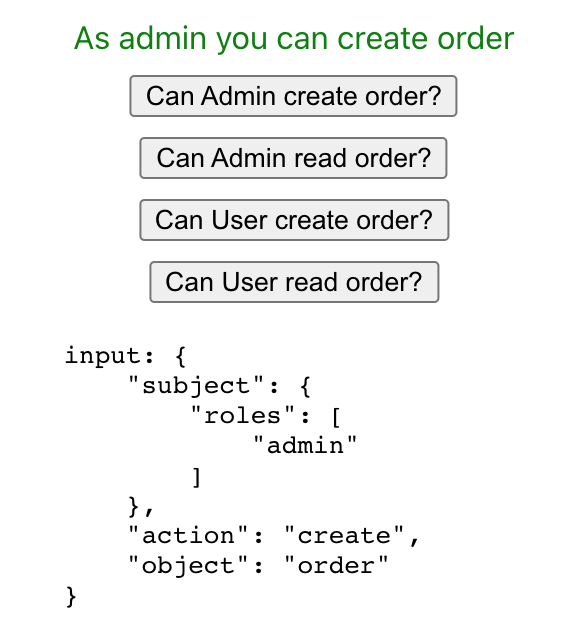 Example UI when the request is authorized
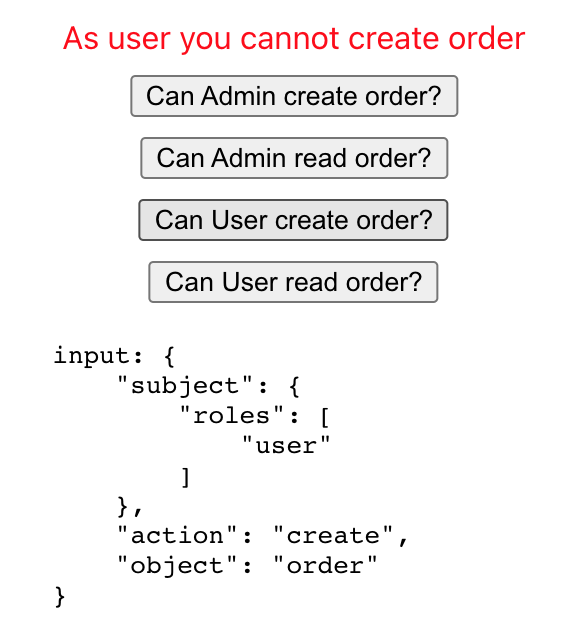 Example UI when the request is not authorized
Conclusion
Well done. You’ve learned the authorization concept in microservices environment. Create authorization policy using Open Policy Agent. Then, apply it to NodeJs backend and ReactJs frontend.
This knowledge should be a good start to apply it in real world.
Authorization is important for every applications. Doing it right and effective is crucial for the applications in the long run.
See the complete code here.
Thank you :D