
This post is part of “Authorization in microservices with Open Policy Agent, NodeJs, and ReactJs” series.
- Introduction
- Backend (this post)
- Frontend
Table of Contents:
- Background
- Prerequisite
- Introduce the demo application
- Create the project
- Create permission check middleware
- Create api endpoints
- Test the demo application
- Conclusion
Background
In the previous post, we wrote permission based authorization rules using Open Policy Agent and run it as api server.
In this post, we will create a backend application using NodeJs. It is an api server that check if the incoming request is authorized before processing the it.
The purpose of this demo is to understand the concept of how to do the authorization in the backend using OPA.
In real microservices environment, such as Kubernetes, this can be done using sidecar by running OPA api server in the same POD or running it as a DaemonSet on every host so the authorization check is lightning fast.
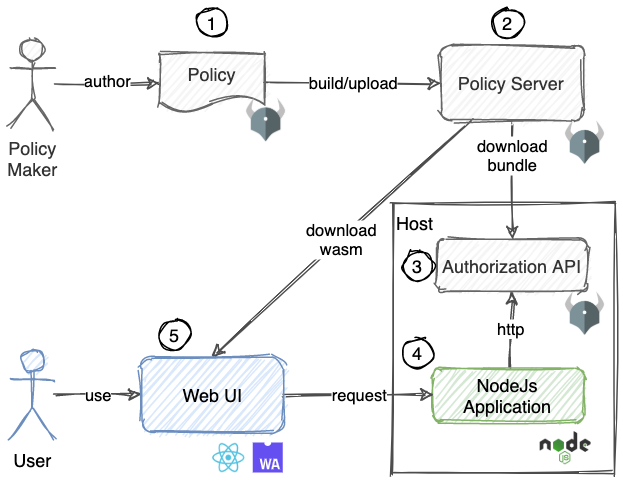 Demo application components
In this post, I will cover no. 4 in the above picture.
Note
The NodeJs application can be replaced with any languages or frameworks because the authorization check is done via http protocol.
Prerequisite
This demo requires these tools to be installed in your machine.
- NodeJs + NPM
Introduce the demo application
This application is a NodeJs that runs api server using ExpressJs. The request to the api will be checked against OPA server using information from “authorization” header in JWT format. If the request is not allow, 403 unauthorized will be returned.
Create the project
mkdir opa-nodejs
cd opa-nodejs
npm init -y

# install dependencies
npm i express jsonwebtoken axios
Create permission check middleware
Create a middleware that check the request’s authorization.
// opa.js
const jwt = require('jsonwebtoken')
const axios = require('axios')

// create a new middleware configured with OPA api server uri
function createOpaMiddleware(opaAgentUri) {
  const client = axios.create({
    baseURL: opaAgentUri,
  })

  return (action, object) => {
    // this will be run per request
    return async (request, response, next) => {
      try {
        // extract request's information from JWT token
        const token = request.headers.authorization

        if (!token) {
          throw new Error("No authorization header")
        }

        const decodedToken = jwt.decode(token)

        // query OPA api server
        const response = await client.post(
          '/v1/data/permission/allow',
          {
            input: {
              subject: decodedToken,
              action,
              object,
            }
          },
        )

        // OPA api server query's result
        const allow = response.data?.result
        if (!allow) {
          throw new Error("Unauthorized")
        }

        // authorized
        await next()
      } catch (err) {
        // unauthorized
        response.status(403).send(err.message)
      }

    }
  }
}

module.exports = createOpaMiddleware
Create api endpoints
Create a simple api endpoints.
- Read order
- Create order
// app.js
const express = require('express')
const createOpaMiddleware = require('./opa')
const app = express()
const port = 3000

// create opa authorization check middleware and provide api server uri
const hasPermission = createOpaMiddleware("http://localhost:8181")

// check if the request is allowed to take action "read" to object "order"
app.get('/orders/:id', hasPermission('read', 'order'), (req, res) => {
    res.json({ message: `you can read order with id ${req.params.id}` })
})

// check if the request is allowed to take action "create" to object "order"
app.post('/orders', hasPermission('create', 'order'), (req, res) => {
    res.json({ message: `you can create order` })
})

// start server
app.listen(port, () => {
    console.log(`OPA NodeJs is listening at http://localhost:${port}`)
})
Test the demo application
Run demo application.
node app.js

# output
# OPA NodeJs is listening at http://localhost:3000
Case 1: Request is allowed to create order.
Create JWT token with input below using https://jwt.io/.
{
  "roles": [
    "admin"
  ]
}
Authorized token.
eyJhbGciOiJIUzI1NiIsInR5cCI6IkpXVCJ9.eyJyb2xlcyI6WyJhZG1pbiJdfQ.CdWxmHjUmRH7m7xqJokcTUgCRcDmoM2FMd5L7sRsNck
Call create order api with token above.
curl --request POST \
  --url http://localhost:3000/orders \
  --header 'authorization: eyJhbGciOiJIUzI1NiIsInR5cCI6IkpXVCJ9.eyJyb2xlcyI6WyJhZG1pbiJdfQ.CdWxmHjUmRH7m7xqJokcTUgCRcDmoM2FMd5L7sRsNck'

# output
# {"message":"you can create order"}
Case 2: Request is not allowed to create order.
Create JWT token with input below using https://jwt.io/.
{
  "roles": [
    "user"
  ]
}
Authorized token.
eyJhbGciOiJIUzI1NiIsInR5cCI6IkpXVCJ9.eyJyb2xlcyI6WyJ1c2VyIl19.4WTEPSSWJBDVk9DXrMd4Y7PcdcK-q8xV5IDuVC0ETfY
Call create order api with token above.
curl --request POST \
  --url http://localhost:3000/orders \
  --header 'authorization: eyJhbGciOiJIUzI1NiIsInR5cCI6IkpXVCJ9.eyJyb2xlcyI6WyJ1c2VyIl19.4WTEPSSWJBDVk9DXrMd4Y7PcdcK-q8xV5IDuVC0ETfY'

# output
# Unauthorized
Conclusion
That’s it. Now, you can use the OPA as an authorization server to the backend application. Next, we will see how to apply the same authorization rules in the frontend side. Next post
See the complete code here.