This post is part of “Authorization in microservices with Open Policy Agent, NodeJs, and ReactJs” series.
Table of Contents:
Background
In distributed environment like microservice, there are many ways we can do the authorization.
Centralized authorization server. Rules are managed and enforced centrally. Every services needs to call to the authorization server to perform authorization check. It is easier to control the rules since they are maintained in one place but this also creates a single point of failure and bottle neck which is not good in a distributed system.
Isolated authorization. In stead of managing the rules in one place, we manage and enforce the authorization in each service separately. This fixes the single point issue but makes it harder to control and maintain the rules consistently.
Centralized rules but distribute the rule enforcement. This approach takes the advantages from the previous two by managing the rules in one place but distribute the rules to each service then enforce it locally.
In my search for an authorization solution in microservices, I came across a solution that meets my goal which is the last approach. This solution uses “Open Policy Agent (OPA)” as authorization rule engine and rules authoring which I will share with you in this series of posts.
What is Open Policy Agent?
Open Policy Agent or OPA is an open source policy engine and tools. You can create policies or rules using its own language called “Rego”. Then you have choices to can your policies, using go code, http api server, or WebAssembly. A very nice thing about the OPA is that it provides editing tools such as VsCode plugin that you can test the policy locally before deploying it to the server (unit testing is also supported).
To run the policies, feed the engine Rego files and a data file (optional), then send a query to the engine with an input json (optional) to get to result. See picture below.
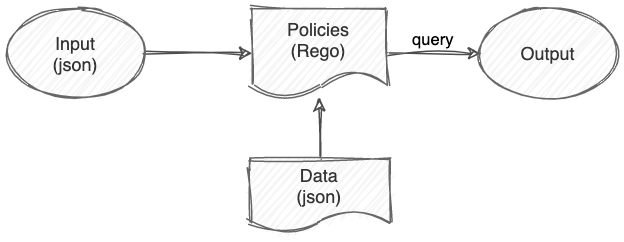 How OPA works
Note.
Input: a json payload sent along with the query that will be used by the policies to decide the outcome.
Rego files: policies or rules written in Rego language.
Data: a json payload containing supporting information the policies can use to decide the outcome such as permission or access control list (it needs to be prepared in advance).
Output: is a result of the query to the engine. It can be a boolean value or json.
Demo application
In this series, I will show you how to create an authorization rules using OPA and enforce the authorization check in NodeJs application and Web UI (React + WebAssembly).
What we will build in this demo.
- Create a policy in rego.
- Run a bundle server that serves the policy bundle.
- Run an authorization API server running OPA engine in http mode. The authorization server will download the policy bundle from the bundle server.
- Run a NodeJs application on the same host as authorization server (As a sidecar in Kubernetes term).
- Create a Web UI that can check the authorization locally using WebAssembly. The Web will download the policy as WebAssembly from the bundle server (Single source of policies).
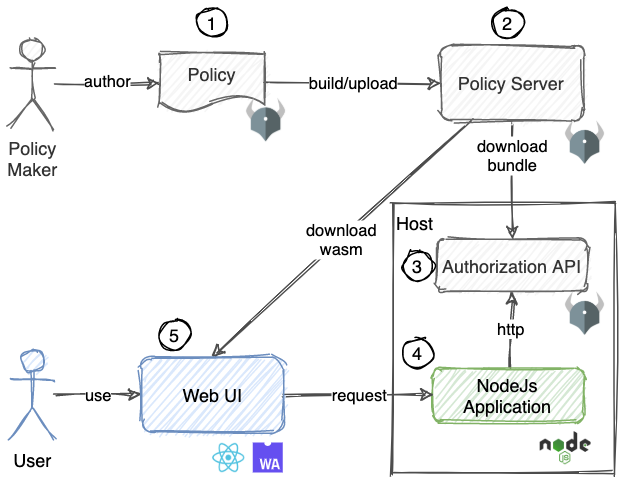 Demo application components
In this post, I will cover no. 1, 2, and 3. The rest will be covered in the next posts.
Prerequisite
This demo requires these tools to be installed in your machine.
- Docker
- OPA cli (download)
Create a simple authorization rule
Let’s start with a simple rule. This rule will check if the user has “admin” role and return allow.
# // simple.rego
package simple

# // default value
default allow = false

allow = true {
    role = input.subject.roles[_] # // each role
    role == "admin" # // allow = true if role matches "admin"
}
Explanation
Return allow = true if any role from input’s field “subject.roles” is “admin”.
To test our rule, write an input json file.
// simple_allow_input.json
{
    "subject": {
        "roles": [
            "admin"
        ]
    }
}
Run the query.
opa eval -f pretty -i simple_allow_input.json -d simple.rego "data.simple.allow"

# output
# true
That’s it. You can change the role in the input file and see the result.
Create a permission based authorization rule
Let’s try something closed to a real authorization - permission. This example, we will write a rule that check if the user’s role has the required permission to take an action to an object.
Writing a data file first. This data file will contain role’s permissions information.
// data.json
{
    "role_permissions": {
        "admin": [
            {
                "action": "create",
                "object": "order"
            },
            {
                "action": "read",
                "object": "order"
            }
        ],
        "user": [
            {
                "action": "read",
                "object": "order"
            }
        ]
    }
}
Writing the rule.
package permission

import data.role_permissions # // import role_permissions from data.json

# // default to not allow
default allow = false

allow {
    role := input.subject.roles[_] # // for every input roles
    permissions := role_permissions[role] # // get permission of the role
    permission := permissions[_] # // for every permission
    permission == {"action": input.action, "object": input.object} # // allow = true when input action and object matches
}
Explanation
We get the permissions for every role in input’s subject.roles field. Then, check if there is any permission match the requested input’s action and object. If found, return allow as true.
Next, let’s test our rule with input below.
// input.json
{
    "subject": {
        "roles": [
            "admin"
        ]
    },
    "action": "create",
    "object": "order"
}
Execute the query.
opa eval -f pretty -i input.json -d data.json -d permission.rego "data.permission.allow"

# output
# true
The query return “true” because the request input.json contains “admin” role which has the permission to “create” the “order”.
Bundle the policy
We will create a bundle of those policies and data.json created above by running opa build in the same folder as the policy files.
mkdir -p public
opa build -t rego -o public/bundle.tar.gz -b .
Note
This command will create bundle.tar.gz in the ./public folder from current folder as indicated by ".".
Running a bundle server
Now, we have a policy bundle ready. Then we will run a bundle server. This post, we will use nginx web server to server the bundle files.
But first, we need to create a nginx custom configuration to support requests from any domain by enable CORS.
# nginx.conf
server {
    location / {
        # enable cors for any one to request to the server
        add_header 'Access-Control-Allow-Origin' '*';
        add_header 'Access-Control-Allow-Headers' '*';
        add_header 'Access-Control-Allow-Methods' 'GET,POST,OPTIONS,PUT,DELETE,PATCH';
    }
}
Next, run nginx using docker on the same folder as the policy files.
docker run -it --name opa-bundle-server --rm -p 8182:80 \
-v $PWD/nginx.conf:/etc/nginx/conf.d/default.conf \
-v $PWD/public:/etc/nginx/html nginx
Note
This script run nginx docker which will serve the files from /public folder and configuration from nginx.conf in current folder.
Open http://localhost:8182/bundle.tar.gz to check if the file can be downloaded.
Running an authorization api server
This demo, we will run opa engine as an api server. Anyone can query to this api server to check the authorization according to the policies from the bundle server.
First, create OPA configuration file to tell the engine where and how to download the bundle.
services:
  demo:
    url: http://opa-bundle-server

bundles:
  authz:
    service: demo
    resource: bundle.tar.gz
    persist: true
    polling:
      min_delay_seconds: 10
      max_delay_seconds: 20
Note
This config tells the engine to download the bundle from “http://opa-bundle-server/bundle.tar.gz” (bundle server’s docker name). It will poll the bundle every 10 to 20 seconds.
Next, run the api server.
docker run -it --name opa-api-server --rm -p 8181:8181 \
--link opa-bundle-server \
-v $PWD:/data openpolicyagent/opa \
run --server \
--addr :8181 \
-c /data/config.yaml
Note
This script runs opa in server mode on port 8181 and use the config.yaml from current host folder. It also links to the bundle docker to be able to download the bundle.
Verify if the api server works by making a query to the server.
curl --request POST \
  --url http://localhost:8181/v1/data/permission \
  --data '{"input": {"subject": {"roles": ["admin"]},"action": "create","object": "order"}}'

# Output
# "result":{"allow":true}}
Conclusion
Congratulation! You’ve learned a way to do authorization in distributed environment. You’ve also learned about OPA, how to write its’ rules and run it as an api server.
Next posts, we will learn how to do the authorization check in the backend and frontend using the servers we created in this post. Next post
Lastly, I would like to share my thought on using OPA to do the authorization.
Pros:
- Rego language is quite flexible and powerful.
- The same policy can be enforced in many places such as backend and frontend.
- OPA Policy can be used in many things from Kubernetes, Ingress and application.
Cons:
- You need to learn another language to write the policy.
- The distribution of the policy is limited to go language, http api server, and WebAssembly. You cannot use it directly with other languages other than go.
See the complete code here.