
This post is part of “Progressive Delivery” series.
- Introduction to Progressive Delivery
- Practical Progressive Delivery with Argo Rollouts - Setup
- Practical Progressive Delivery with Argo Rollouts - BlueGreen
- Practical Progressive Delivery with Argo Rollouts - Canary (this post)
- Practical Progressive Delivery with Argo Rollouts - Auto rollback with metrics
Table of Contents:
Background
This post is a step-by-step guide to perform a Canary deployment using Argo Rollouts. See this post to learn more about Canary deployment. You can also learn more about Argo Rollouts in this post.
Prerequisite
- A Kubernetes cluster and client cli tools (Follow this post)
- Argo Rollouts installed (Follow this post)
- Make sure that you clone this repository (if not done already) into your computer.
git clone https://github.com/pongsatt/k3s-argo-rollouts.git
cd k3s-argo-rollouts
Simple Canary deployment
A simple Canary deployment does not need an Ingress controller as an external dependency, thus more simpler. The number of pods in each version is used to control the traffic splitting. The incoming traffic will be split using Kubernetes native service load balancing mechanism (default to round robin).
The downside of this approach is that the traffic will be split proportionally with the number of your replicas. For example, if you have 5 replicas, you will be able to split the traffic by a percentage of pods in the new versions such as 20-80% (1/5 pods), 40-60% (2/5 pods), 60-40% (3/5 pods), 80-20% (4/5 pods).
The deployment steps for the simple Canary deployment demo are.
- Deploy 100% of Blue version (5 Blue replicas)
- Deploy 20% of Yellow version (Canary) (1 Yellow replicas, 4 Blue replicas)
- Manually promotes Yellow version (Canary) to 40%, wait 1 minutes and promotes Yellow version to 100%
1. Deploy 100% Blue version (first time deployment)
Run command below to perform a first time deployment.
kubectl apply -f ./canary-rollouts-demo
Note.
This command will install.
- rollout.yaml. A rollout resource named “canary-rollouts-demo” which will install image “argoproj/rollouts-demo:blue” to the cluster.
- service.yaml. A Kubernetes service that will route the traffic to the demo application.
- ingress.yaml. A NGINX ingress which will route the traffic from outside of the cluster to the service.
Run this command to start Argo Rollouts dashboard.
kubectl argo rollouts dashboard
Open http://localhost:3100 to see the dashboard.
 Dashboard UI the demo application started successfully
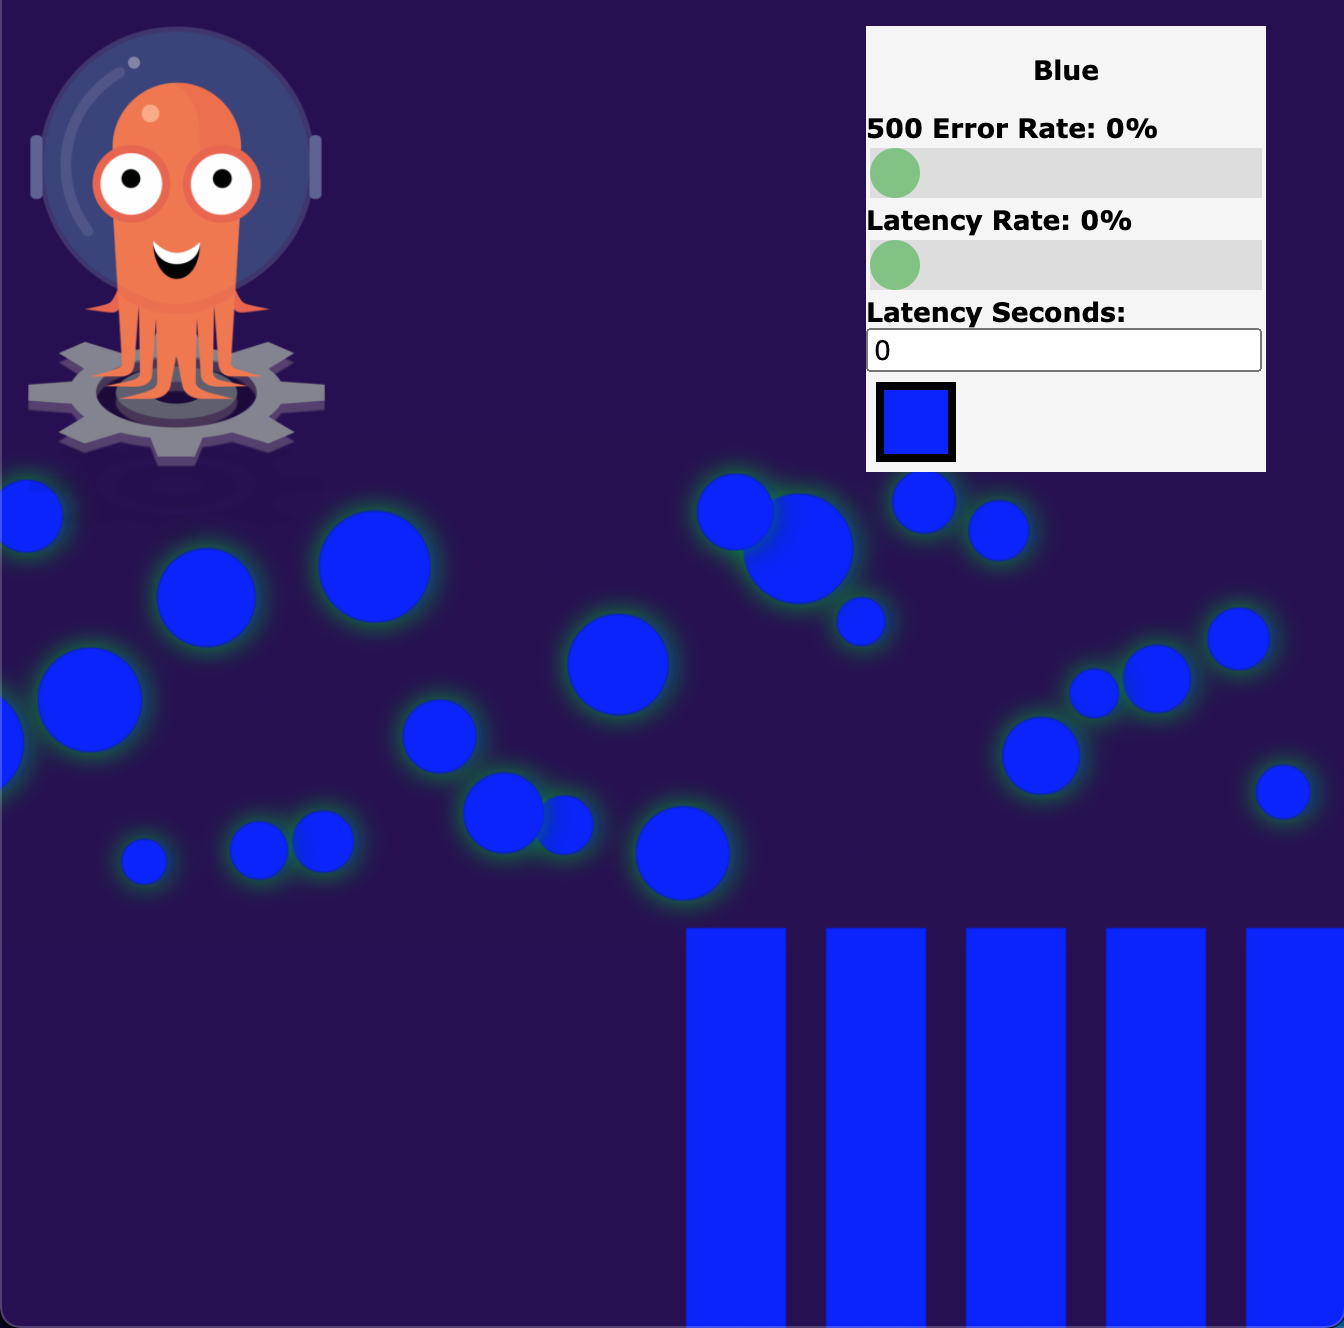
Open http://canary-rollouts-demo.192.168.1.61.nip.io to see “canary-rollouts-demo” and you should see.
 Argo Rollouts Demo Application showing 100% of traffic is Blue version
Note.
“192.168.1.61” is the Kubernetes master node IP address (if you create the cluster following this post). Any node IP address will work.
2. Deploy 20% of Yellow version (Canary)
Next, we will deploy the Yellow version as a Canary by updating ./canary-rollouts-demo/rollout.yaml to use Yellow version.
...
    spec:
      containers:
      - name: canary-rollouts-demo
        image: argoproj/rollouts-demo:yellow
...
Then, re-apply the application again.
kubectl apply -f ./canary-rollouts-demo
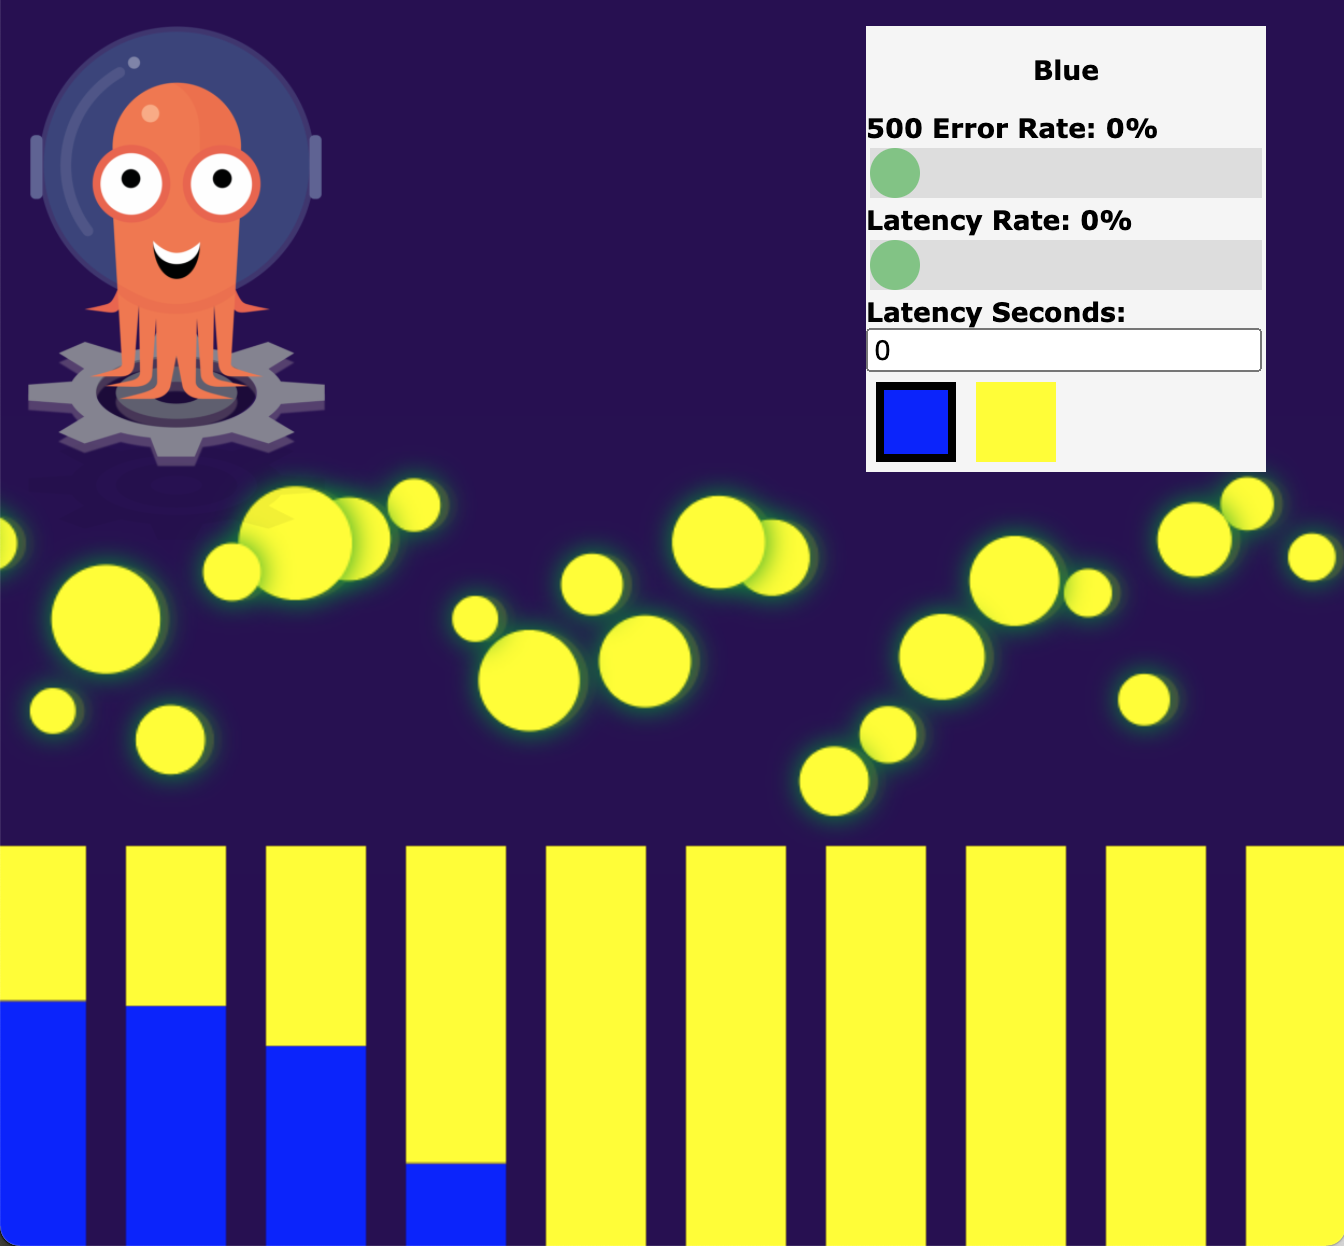
Open http://canary-rollouts-demo-preview.192.168.1.61.nip.io and you will see that 20% of the traffic is routed to Yellow version.
 Demo application shows 20% traffic to yellow version
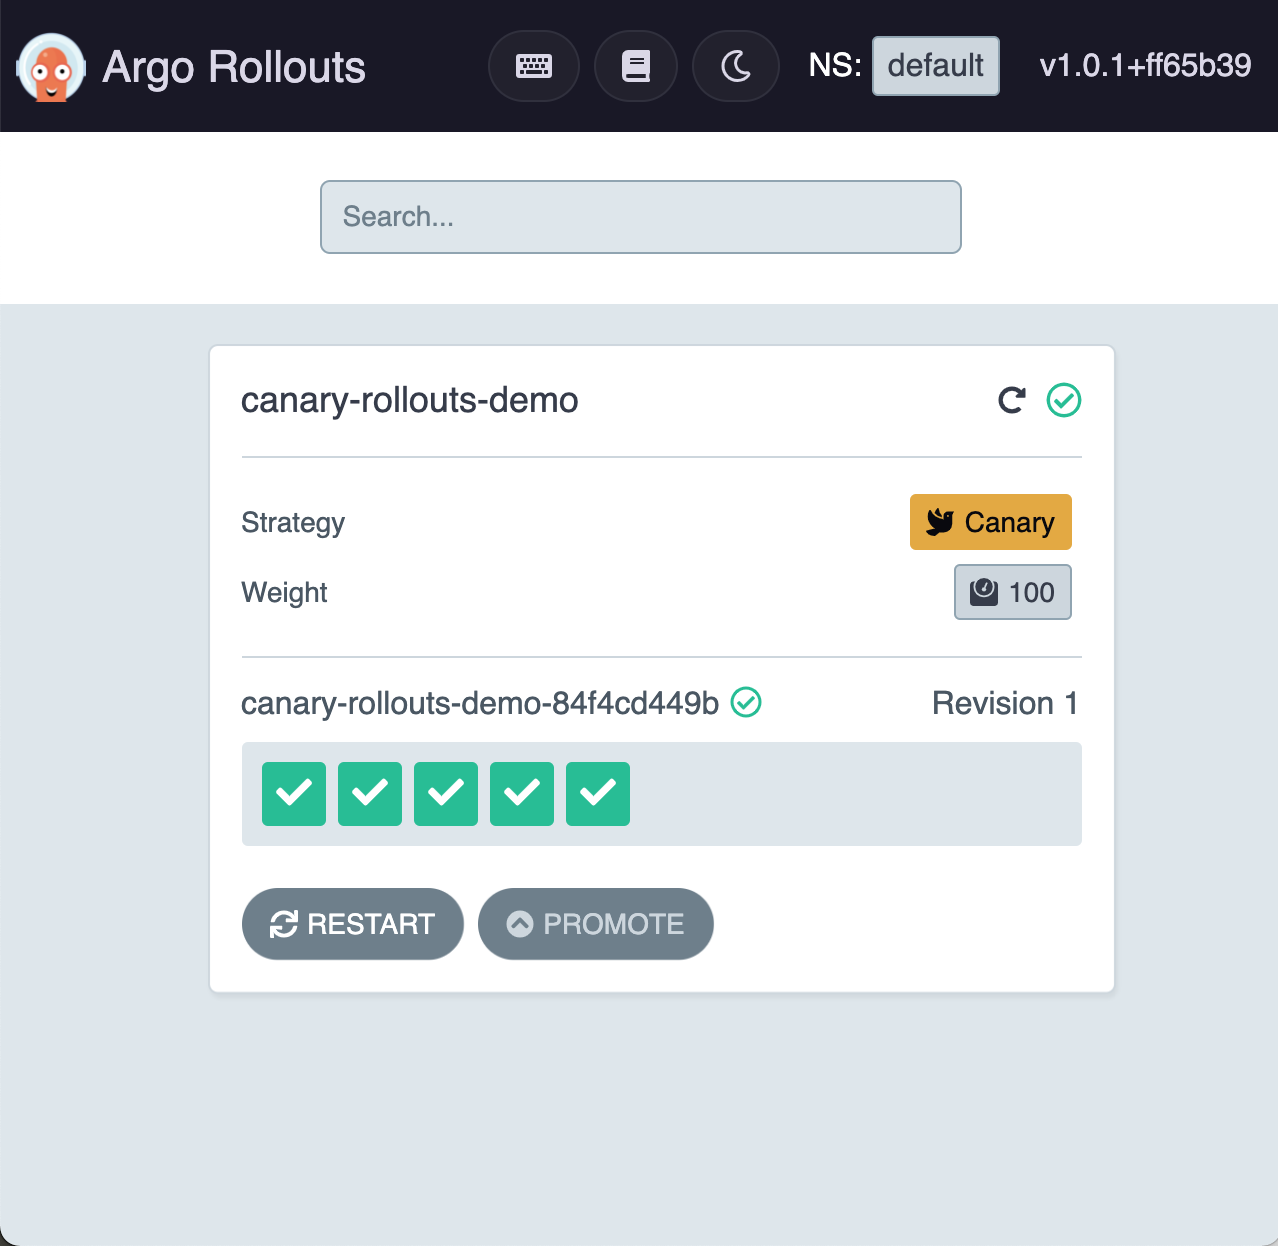
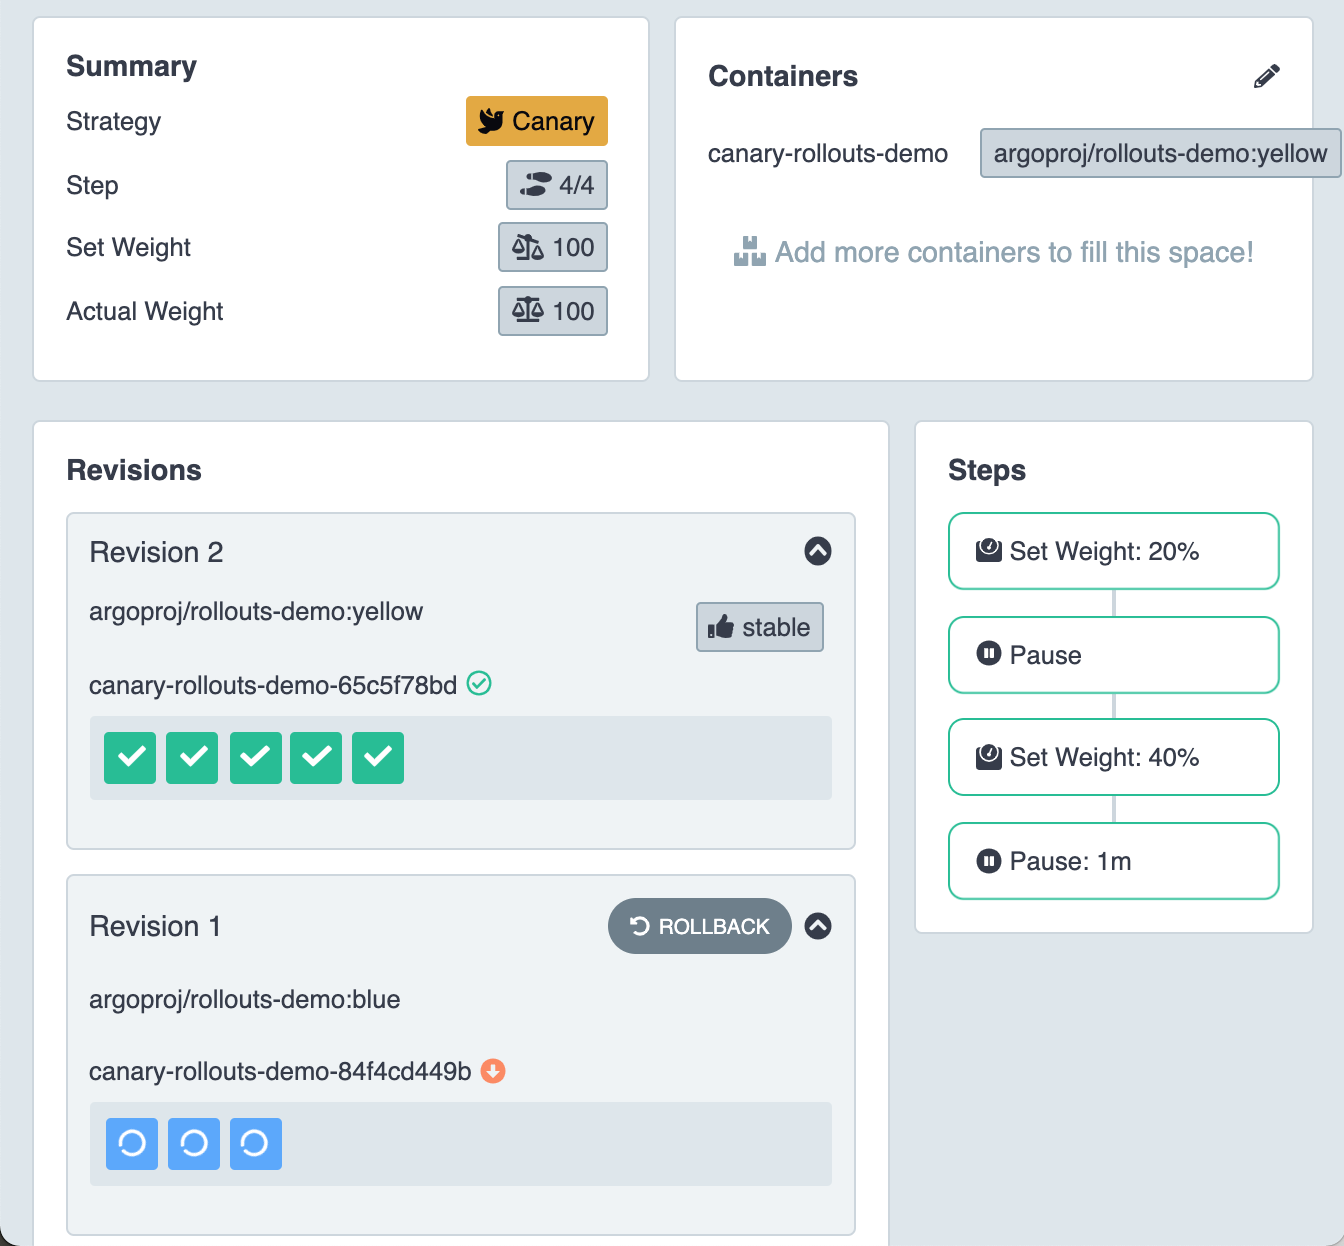
On the dashboard (http://localhost:3100), click on the deployment, you will see that 1 pod is in Yellow version (Canary) and 4 pods still are in Blue version. In the “Steps” section, you will also see that the Canary weight of Yellow version is set to 20% and it’s paused and wait for a manual promotion.
 Dashboard shows 1 pod in Yellow and 4 pods in Blue
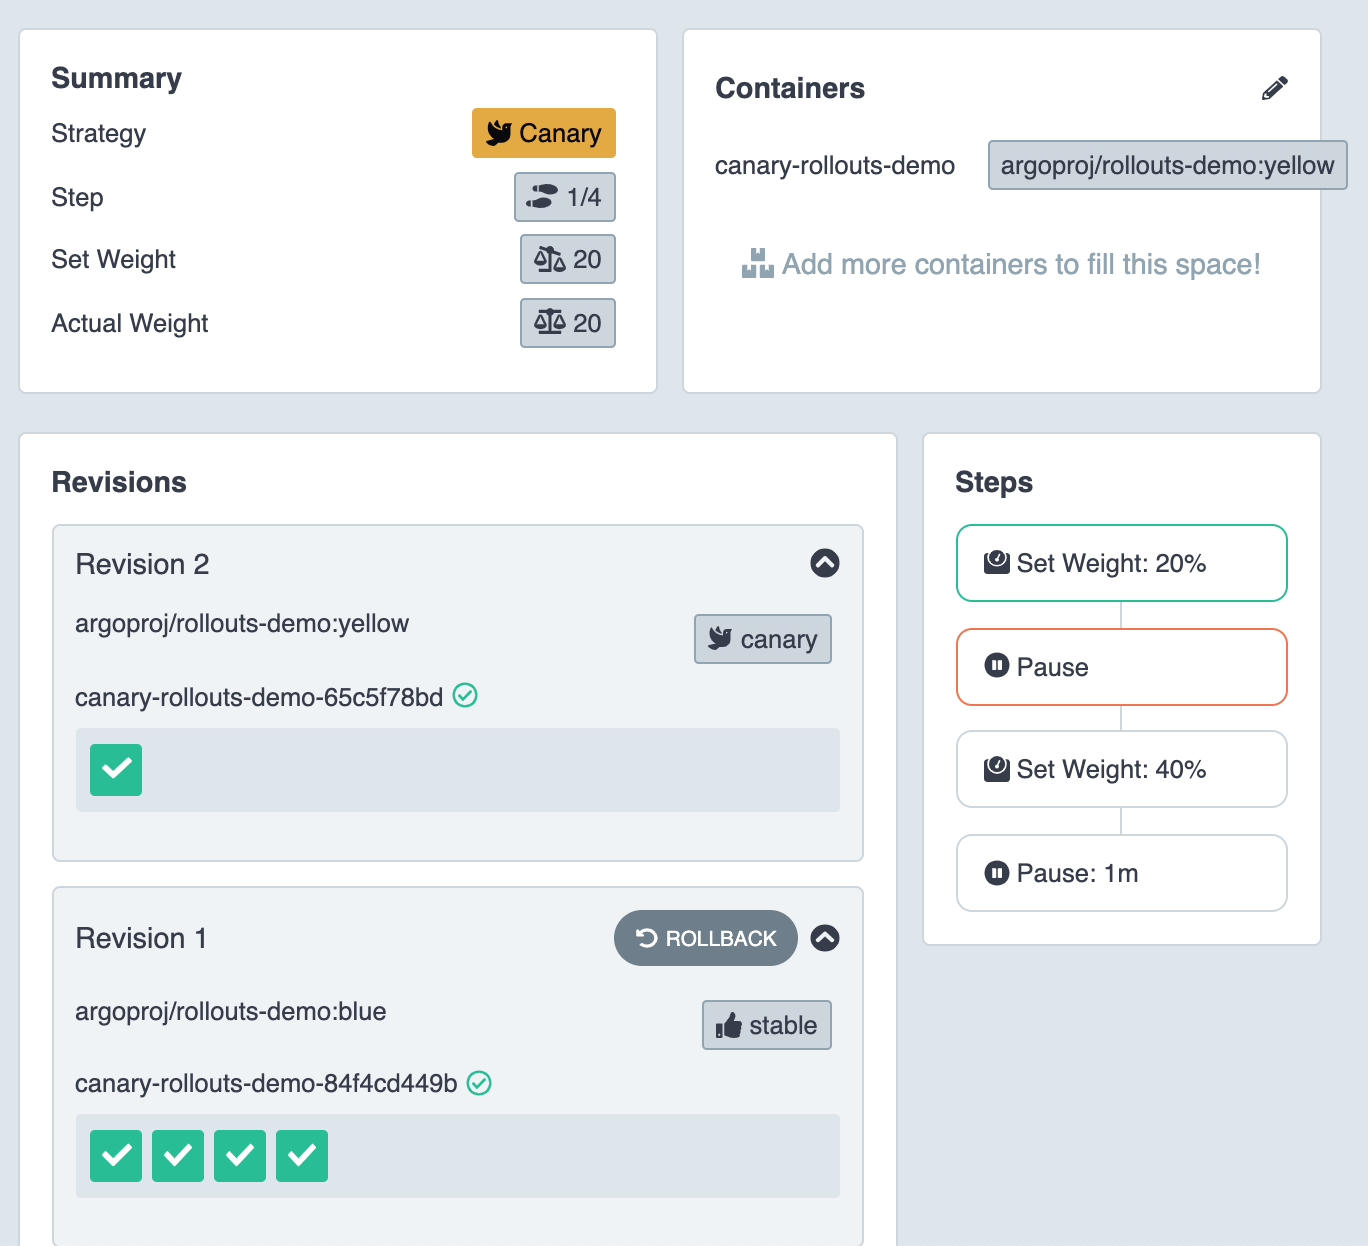
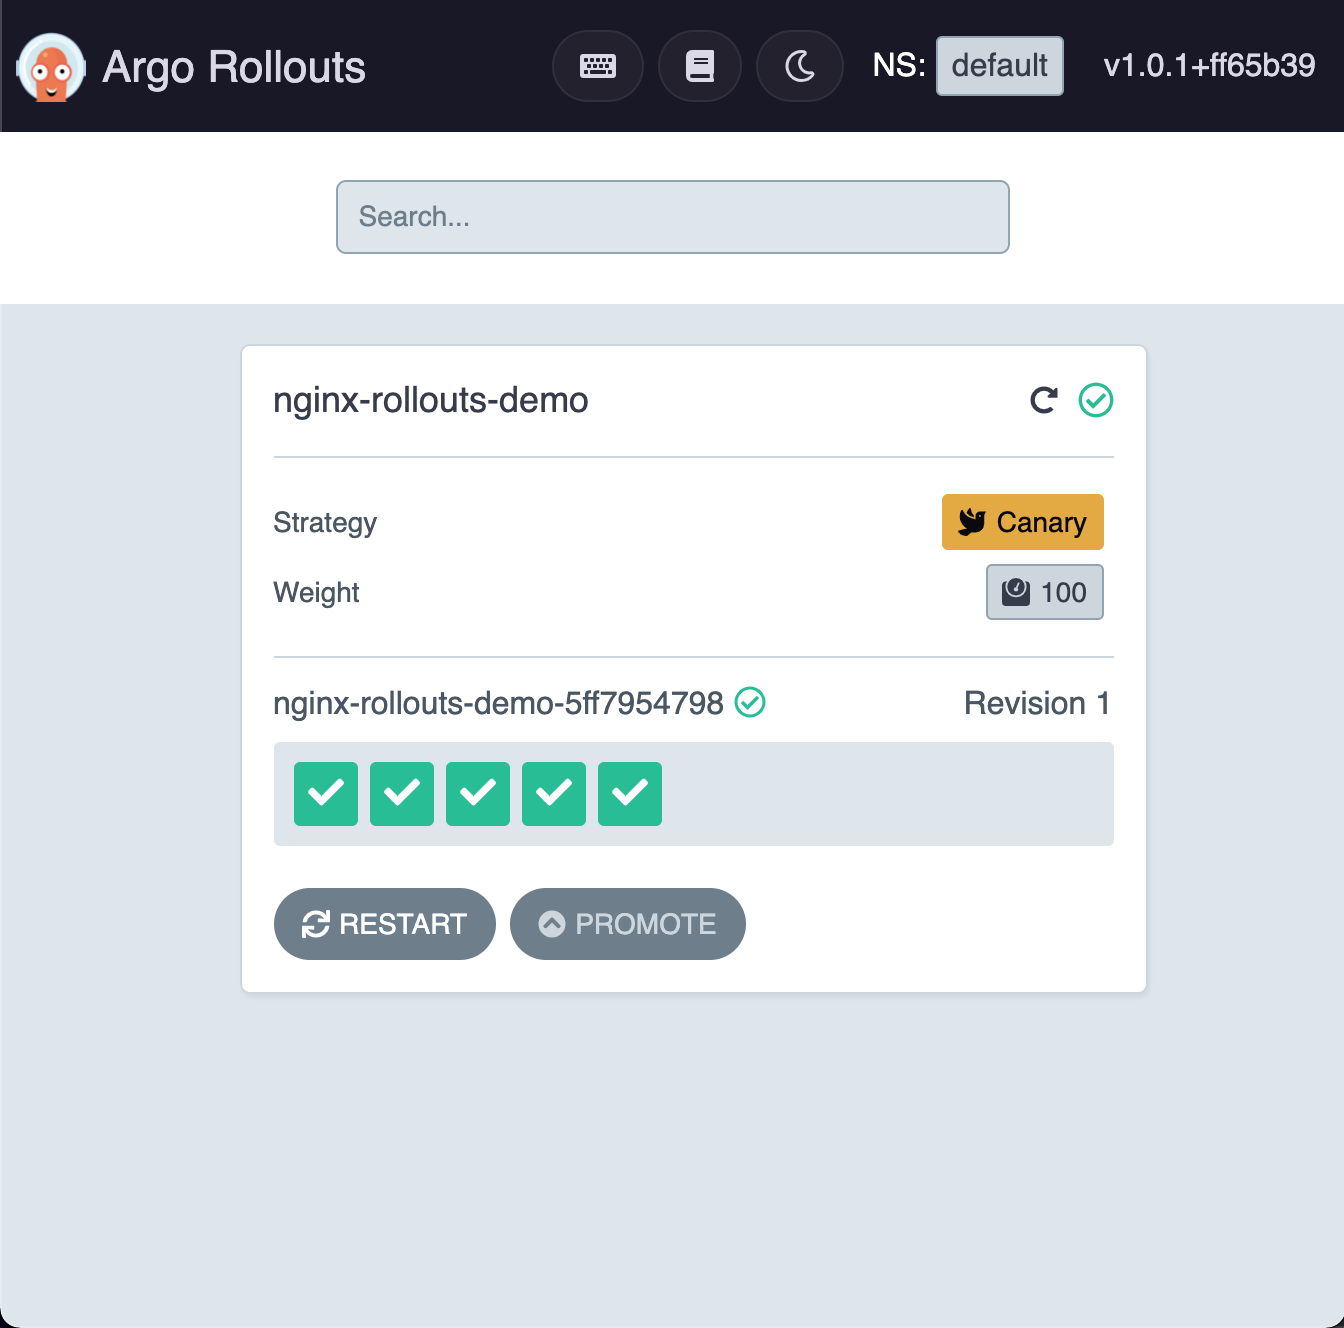
3. Manually promote the Yellow version (Canary) to the next stage
Next, we will promote the Canary version to 40%, then wait for 1 minutes and it will be automatically promoted to 100%.
On the dashboard, click “Promote” button and click confirm.
Now, you we see that the Canary version are scaled to 40% or 2/5 pods.
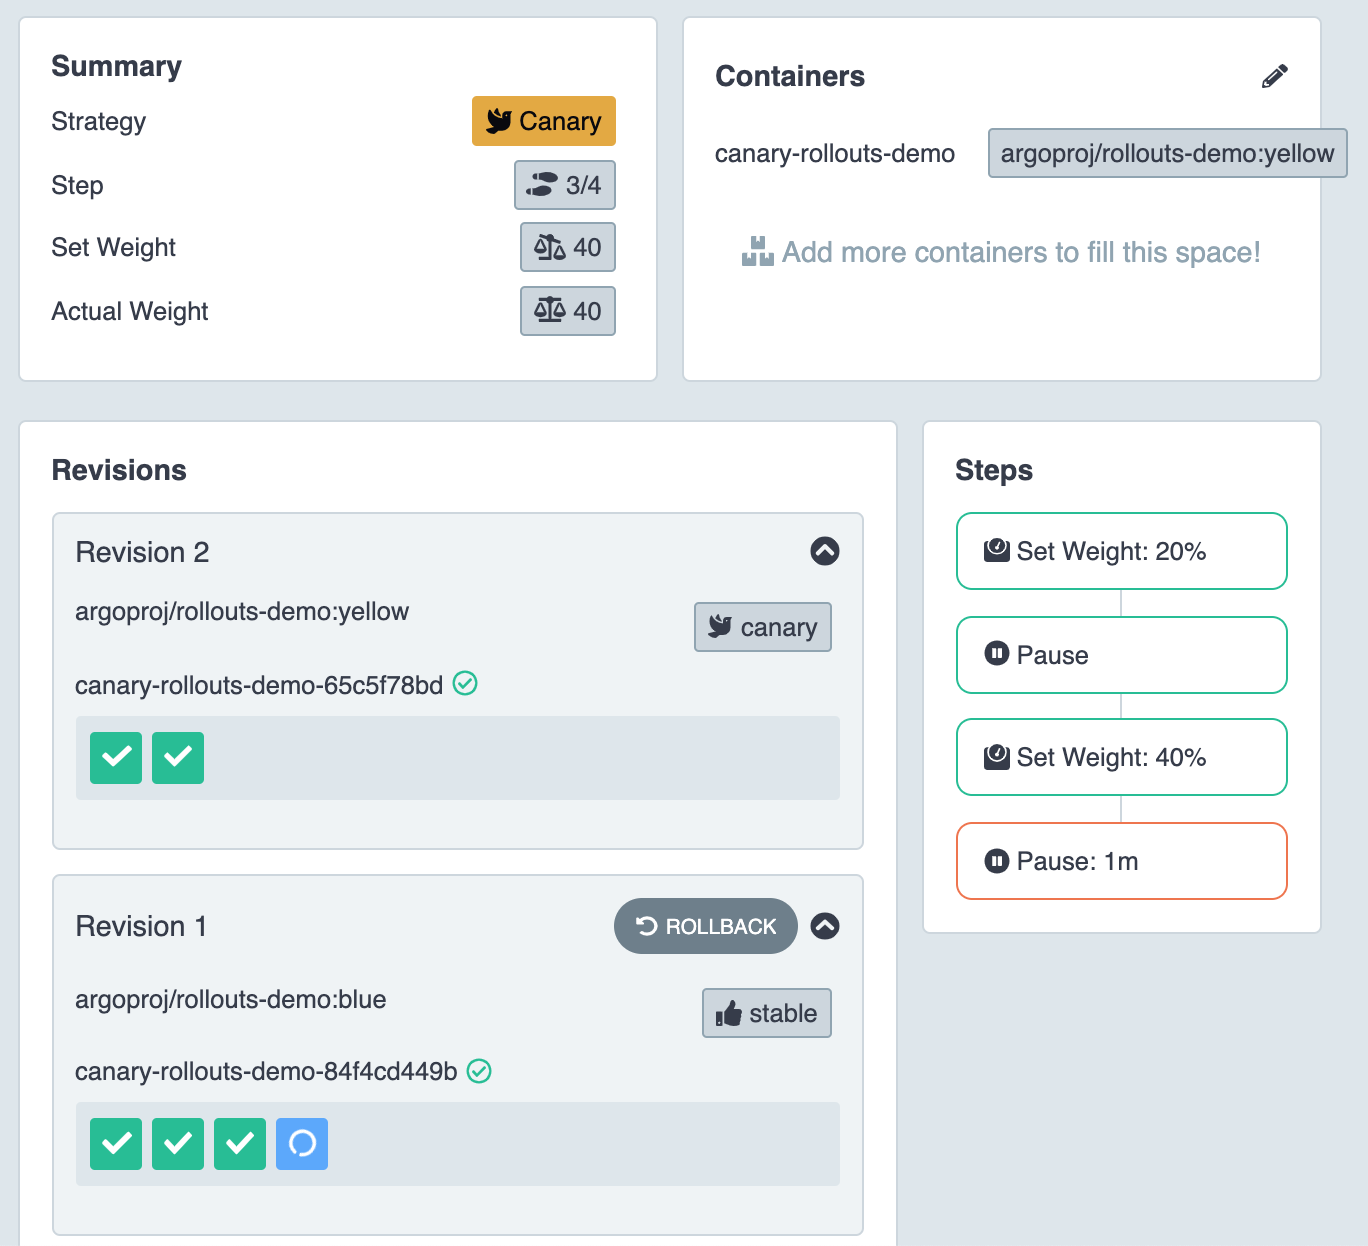 Dashboard shows 40% of Canary version promoted
Then, wait for 1 minutes and you will see that the canary version is automatically promoted to 100%.
 Dashboard shows 100% of Canary version promoted
Open the demo application and see that the 100% traffic has moved to the Yellow or Canary version.
 Dashboard shows 100% of traffic is Canary
Canary deployment using NGINX ingress
The simple Canary deployment above is quite limited in controlling the traffic to the new version. In practice, we use Ingress to enable a fine-tuned traffic control such as 1% of the traffic to the Canary version. Argo Rollouts supports multiple ingress controllers such as NGINX, Ambassador, Istio etc. (See Argo Rollouts Traffic Management for more detail).
Next, I will demo the use of NGINX Ingress controller which we has already setup to control the Canary traffic.
The steps for this demo are.
- Deploy 100% of Blue version
- Deploy 5% of Yellow version (Canary)
- Manually promotes Yellow version (Canary) to 10%, then automatically increase to 50%, 80% and 100% every 2 minutes
1. Deploy 100% Blue version (first time deployment)
Run command below to perform a first time deployment.
kubectl apply -f ./nginx-rollouts-demo
Note.
In additional to simple Canary deployment, this command will install.
- canary-service.yaml. A Kubernetes service which will be used by Argo Rollouts to control the traffic to the Canary version.
Open the dashboard (http://localhost:3100) to see the deployment.
 Dashboard UI the demo application started successfully
Open http://nginx-rollouts-demo.192.168.1.61.nip.io and you should see.
 Argo Rollouts Demo Application showing 100% of traffic is Blue version
2. Deploy 5% of Yellow version (Canary)
Next, we will set the traffic weight of 5% to the Canary version by updating ./nginx-rollouts-demo/rollout.yaml to use yellow version.
...
    spec:
      containers:
      - name: nginx-rollouts-demo
        image: argoproj/rollouts-demo:yellow
...
Note.
The percentage of the Canary weight is set in the deployment configuration in “rollout.yaml” file
Then, re-apply the application again.
kubectl apply -f ./nginx-rollouts-demo
You can see from the browser (http://nginx-rollouts-demo.192.168.1.61.nip.io) that more traffic is routed to the Canary version (roughly 5%).
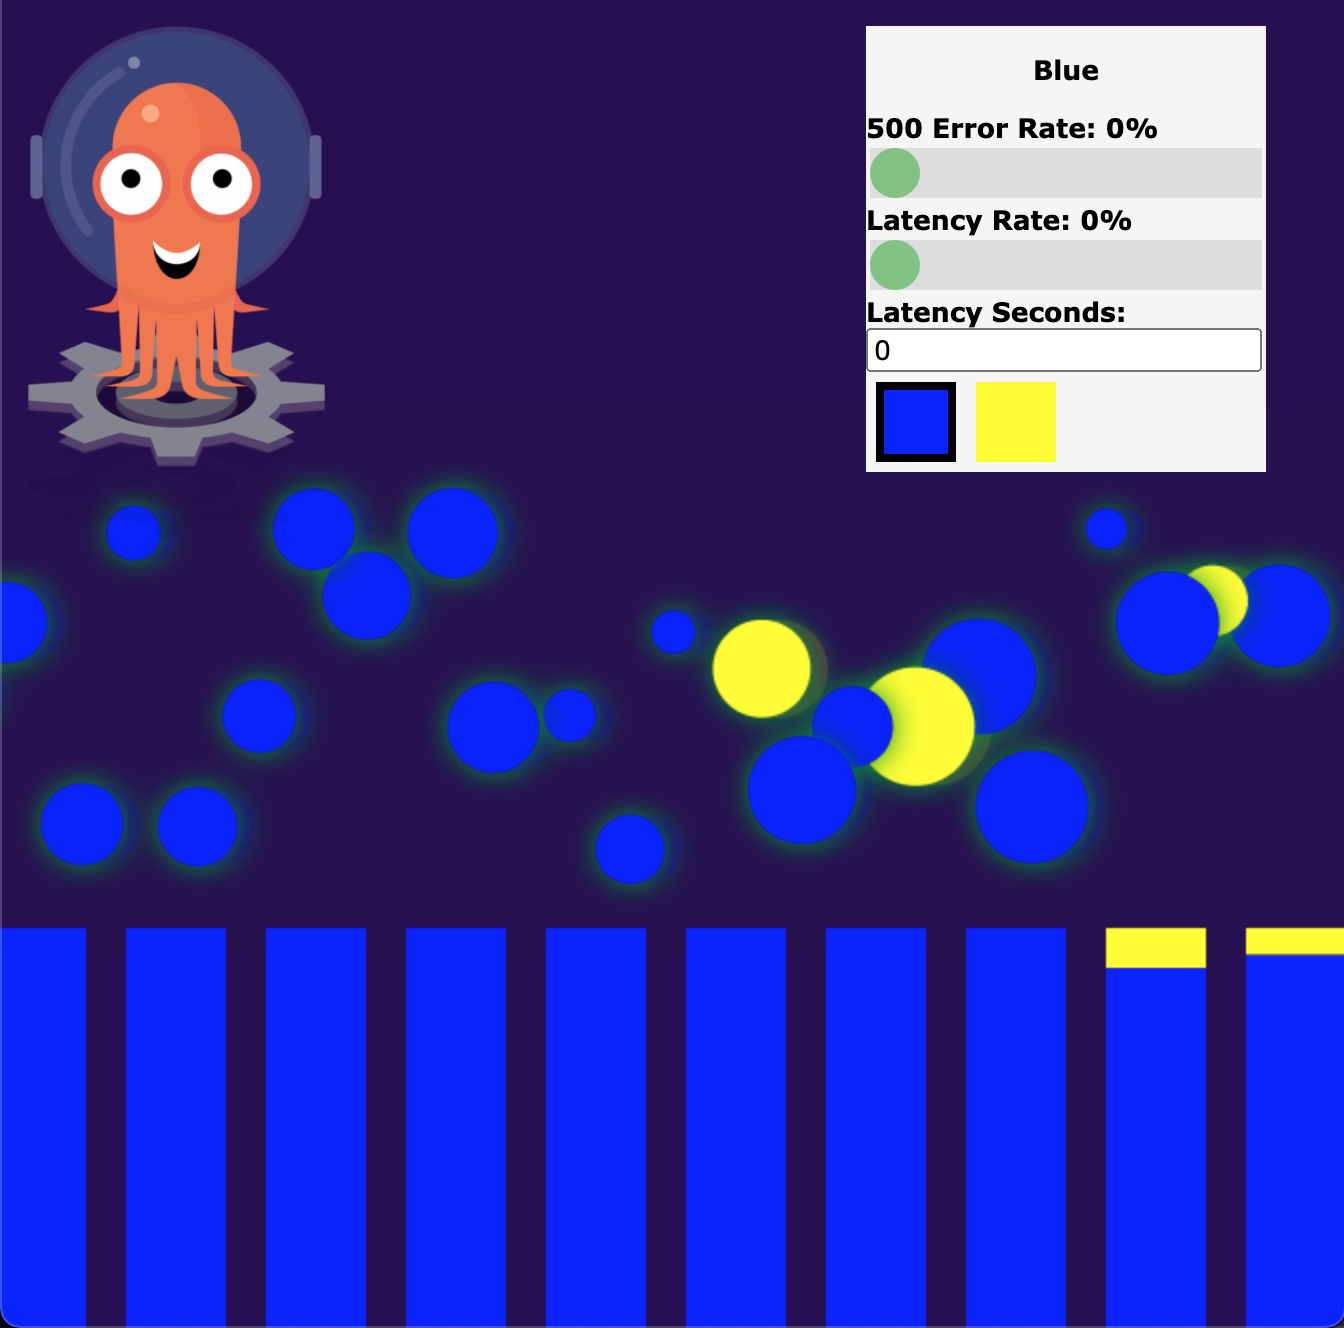 Demo application shows 5% traffic to the yellow version
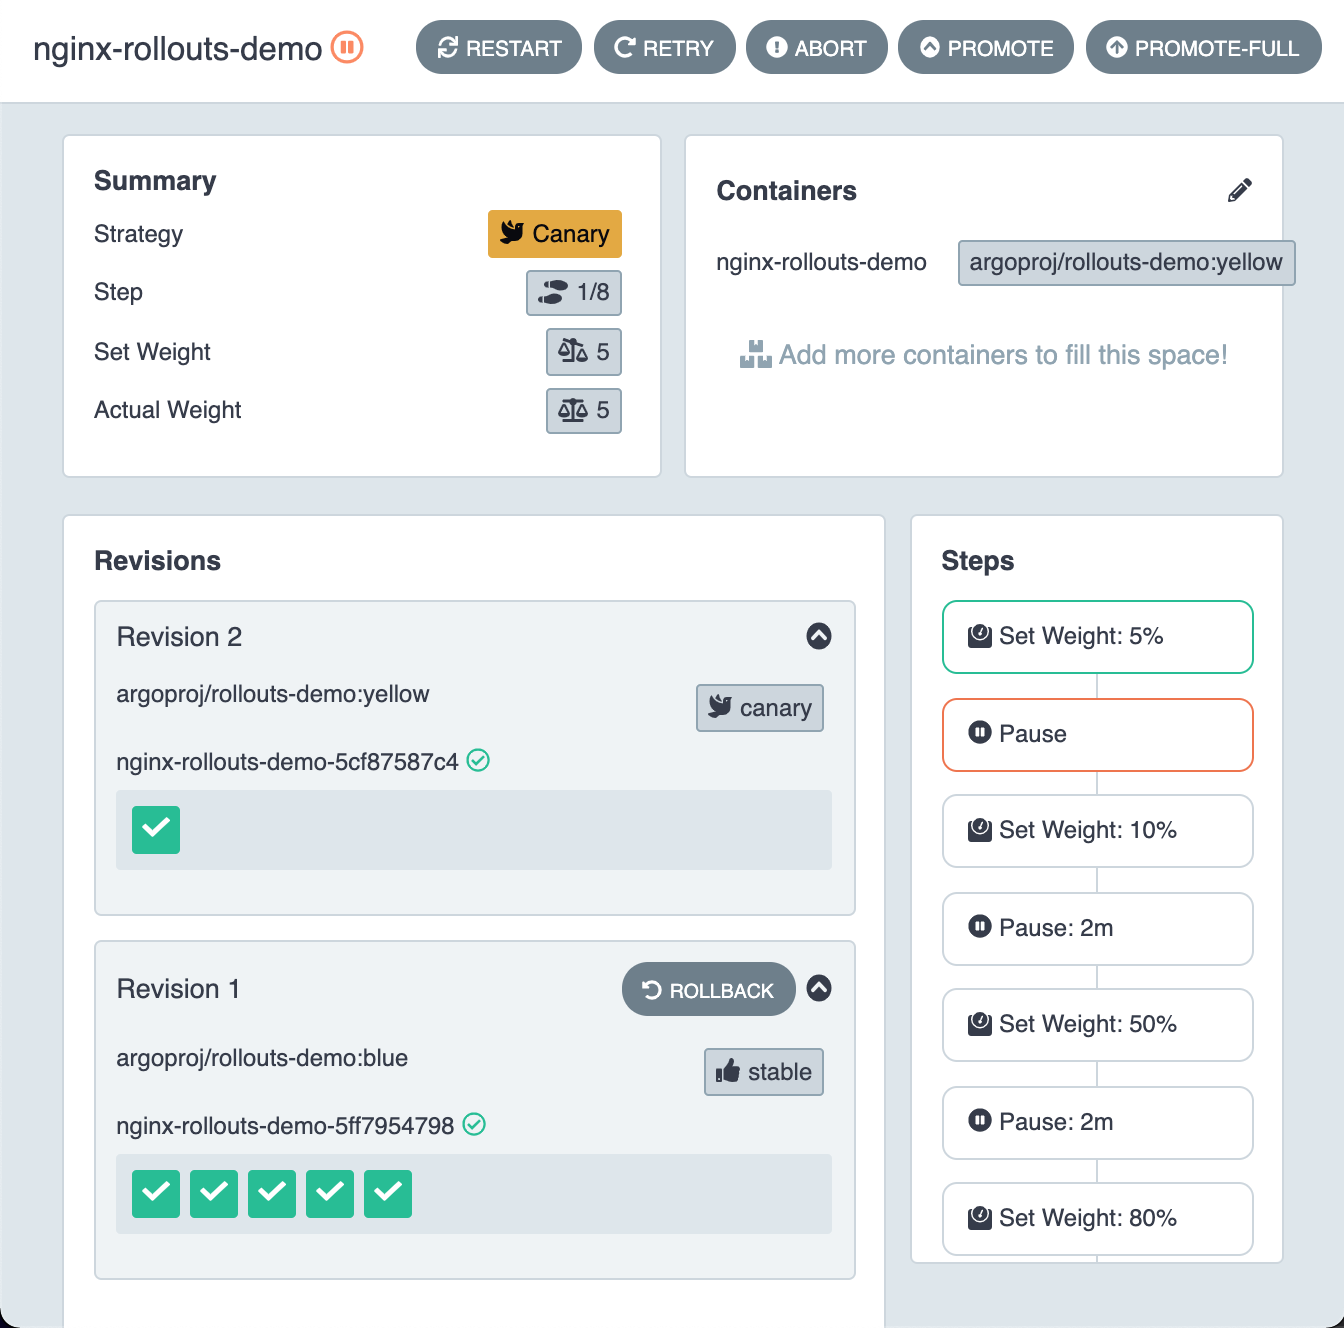 Dashboard shows the first step of the Canary deployment
3. Manually promote the Yellow version (Canary) to the next stage
Click “Promote” button and click confirm on the dashboard (http://localhost:3100) to start the automatic promotion process.
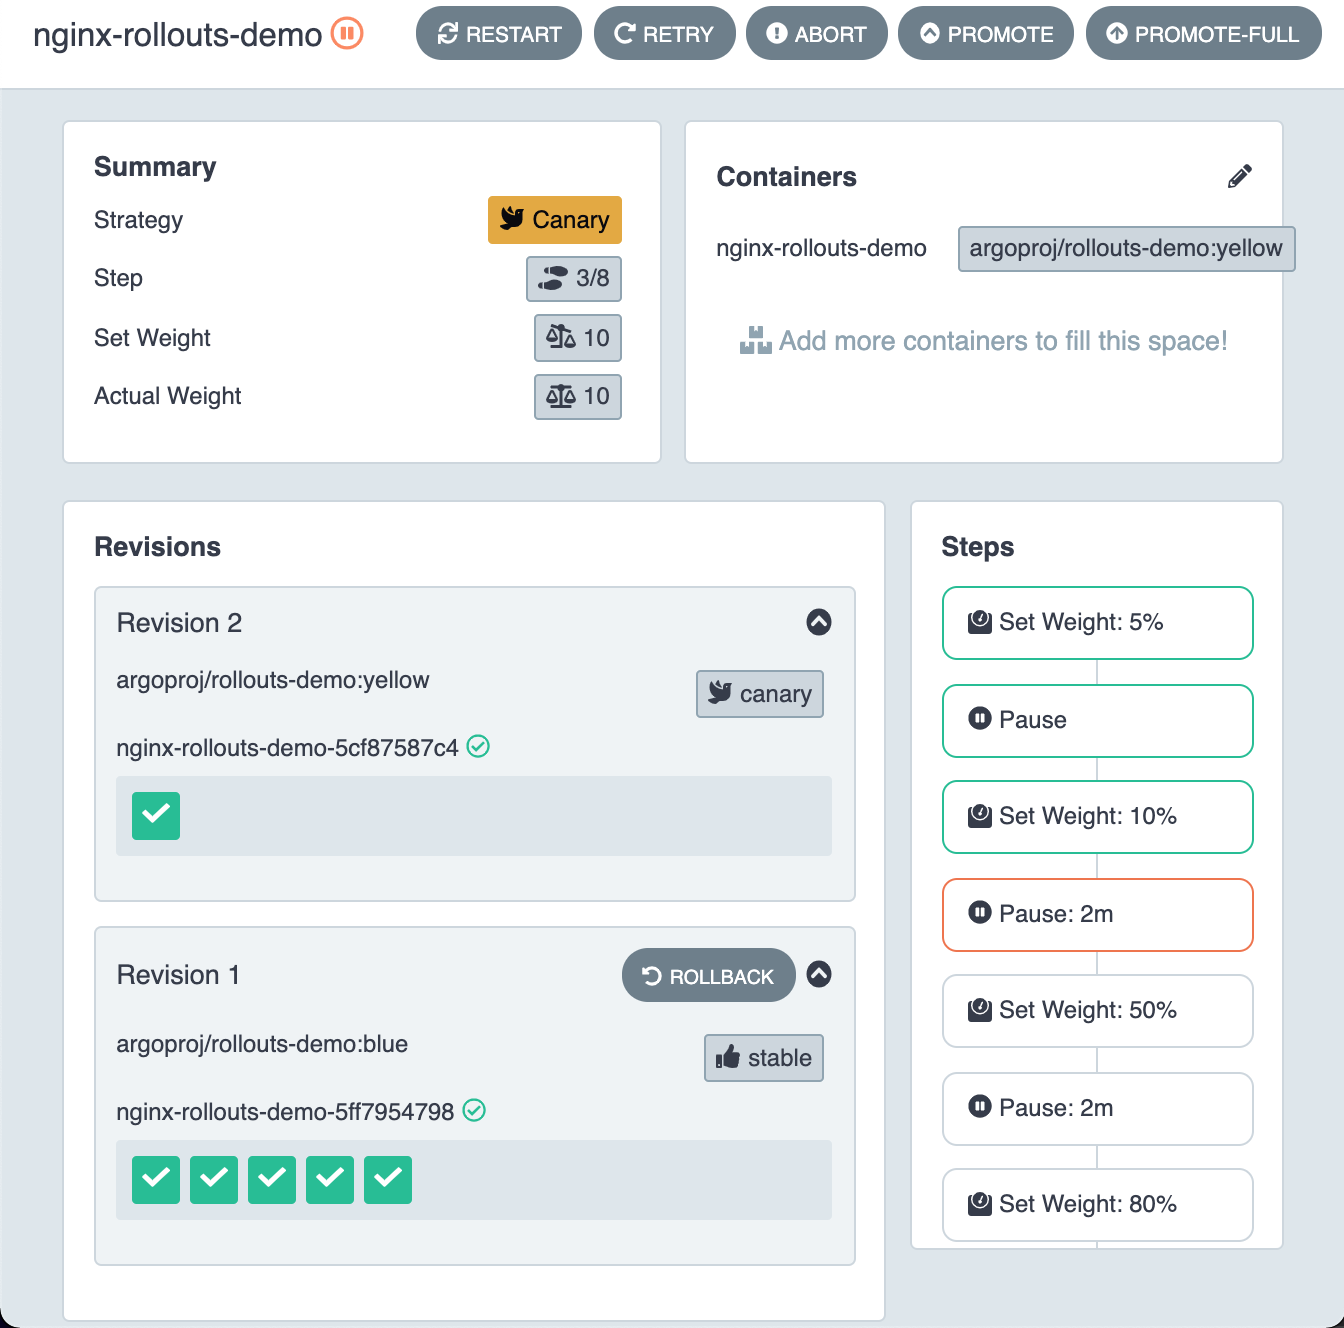 Dashboard shows next steps of the Canary deployment
Every 2 minutes, the demo application will increasingly show the yellow version.
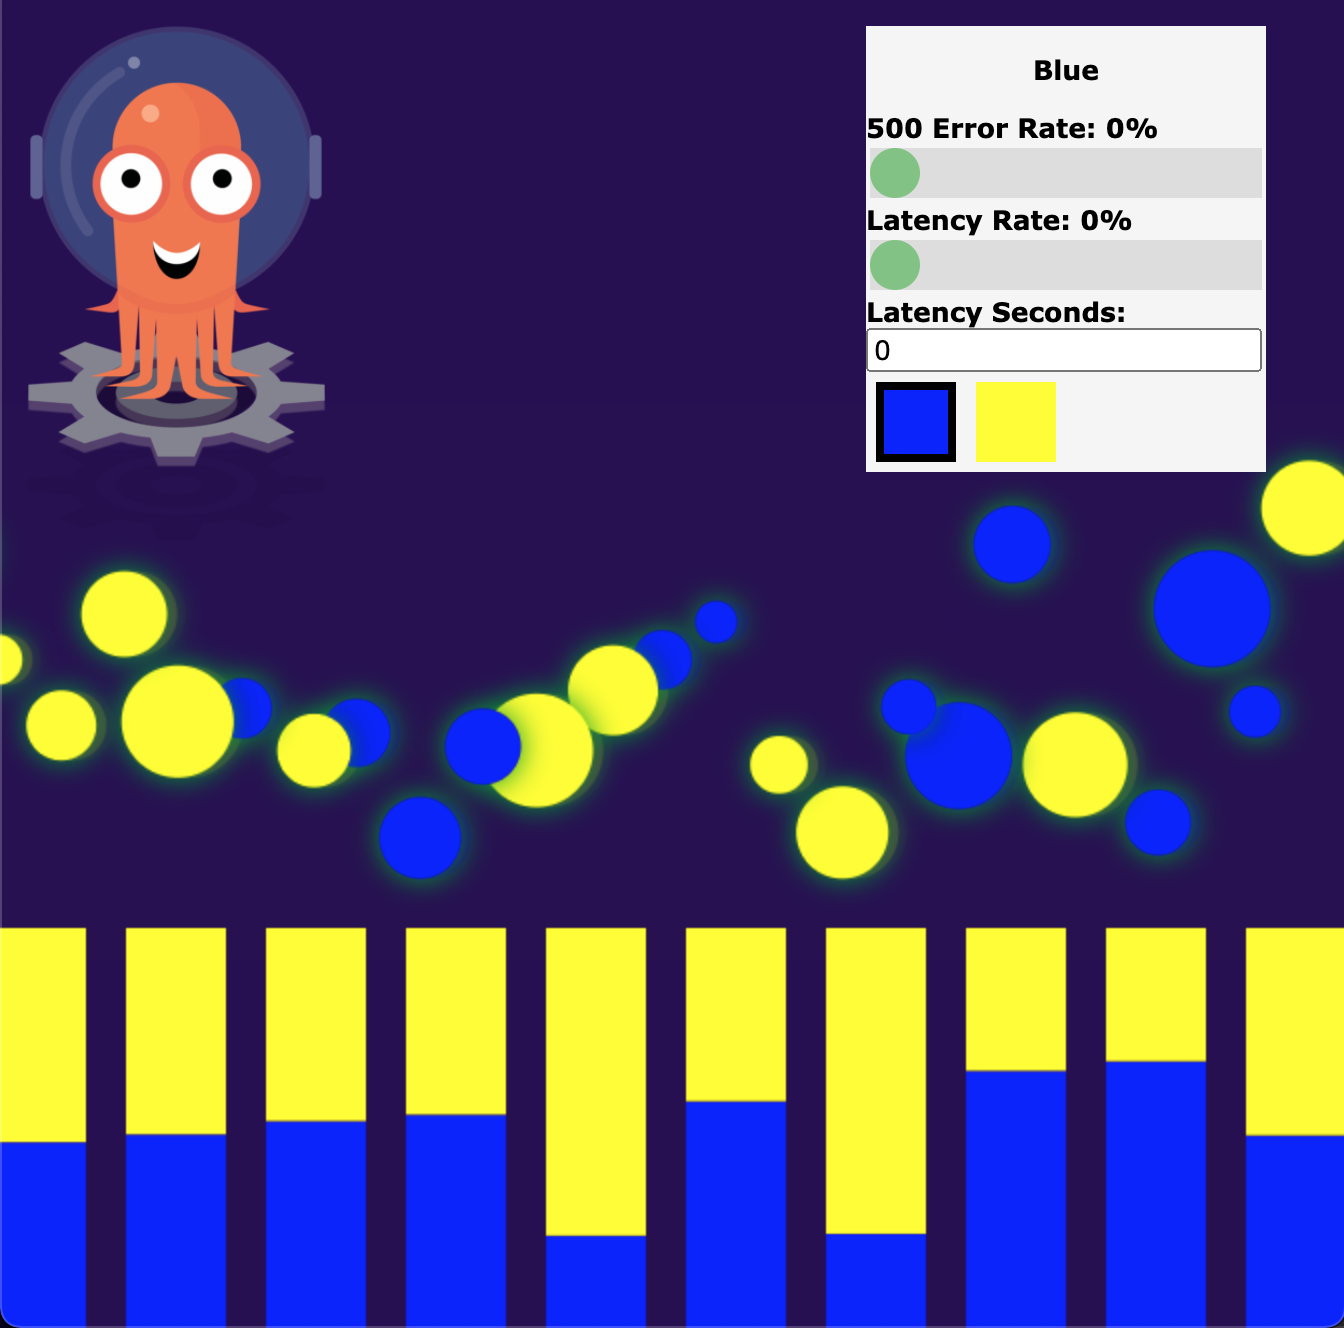 More traffic goes to Yellow version
Note.
What happened behind the scene.
- Argo Rollouts created another ingress that route traffic to the canary service as defined in “canary-service.yaml”.
- When the weight changed, Argo Rollouts will set the weight on the ingress created above which caused the incoming traffic to route to the canary service with the configured weight.
Conclusion
In this post, you learned how to do the Canary deployment using Argo Rollouts. Simple Canary does not rely on ingress but could not do a fine grained control. On the other hand, using Ingress to control the traffic is more practical and is recommended in real life usage. Next, I will show you how to perform a more advance Canary deployment using Prometheus metrics.