Table of Contents:
- Background
- What are feature toggle and A/B testing
- What is Unleash
- How does Unleash work?
- Setup Unleash server
- Create a ReactJS demo application
- Run an A/B testing
- Conclusion
Background
In this tutorial, you will learn the concepts of feature toggles and A/B testing, then build an application using these concepts. We will build a demo application using ReactJs and Unleash servers to run an experiment.
What are feature toggle and A/B testing
In the previous post about “Progressive Delivery”, we talk about the way to deliver software better and faster. One important aspect is to get feedback from the real customer through experimentation. Feature toggle is a technique to enable some features to the user or a group of users. This allows us to continuously deliver new features to production and enable them when ready. We can also use this technique to show a different variant of a feature to different users, then measure feedback for each variant, this is called A/B testing.
What is Unleash
Unleash is open-source software that provides feature toggle, A/B testing, and metrics. Unleash provides core and support components that you can use to suit your needs.
Unleash components:
- API Server - Unleash’s core component that runs feature toggle and metrics including Admin API for configuration and Client API for feature toggle query.
- Admin UI - UI to configure feature toggle and related artifacts.
- SDK - Client SDK for web, mobile app, and backend to connect to API Server/Proxy Server.
- Proxy - A proxy to API Server for web and mobile front-end clients to query feature toggles so that we don’t need to expose API Server to the external party directly. It also helps share the workload with the API server hence better performance.
There are 2 versions, open source and enterprise. The enterprise version has more feature sets.
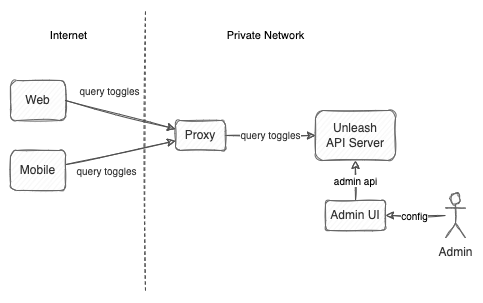 Unleash Components
How does Unleash work?
When we create a feature toggle, we create a feature name, activation strategy, and variants.
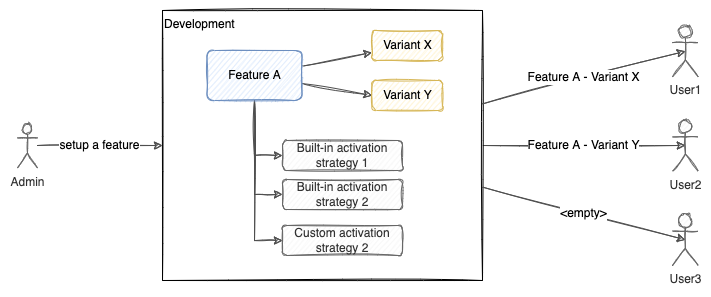 A sample feature toggle - Feature A
From the picture above, an admin set up a feature called “Feature A”.
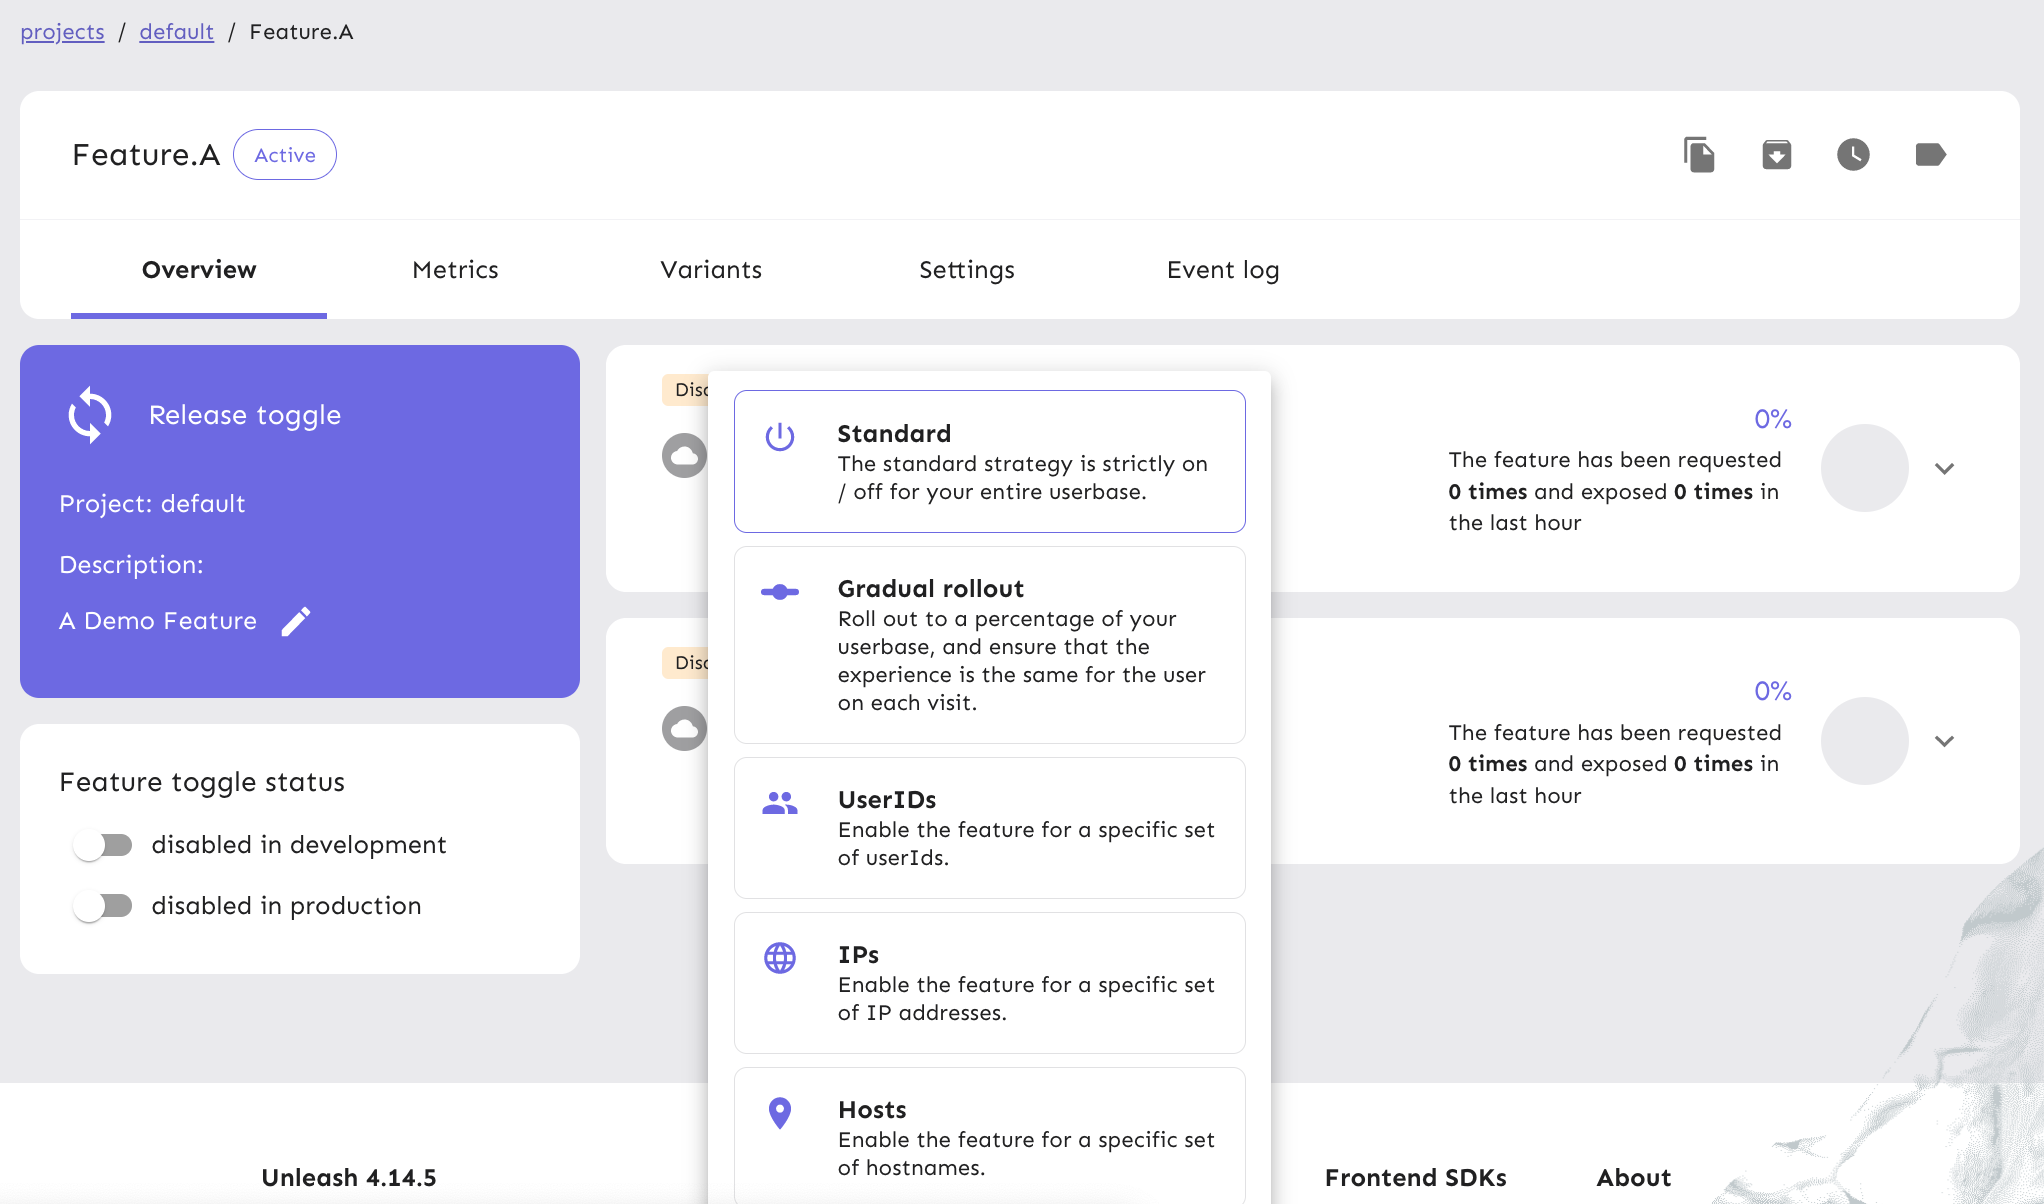
Activation strategy - when a user queries the toggle for “Feature A”, Activation strategies are evaluated, if one of the strategies returns “true”, the user sees that feature and the evaluation stops.
Built-in activation strategy - Unleash provides some strategies out of the box such as “Standard”, “Rollout”, and “IPs”. (For the enterprise version, more things can be configured such as region constraint or segmentation)
Custom activation strategy - You can create your activation strategy in case the built-in strategy does not meet your needs or you would like to replicate the enterprise version’s strategy on your own.
Variant - when a feature is activated for a user, if the variant is configured, each user will see a different variant. This means that a user sees different variants for the same feature. This facilitates A/B testing.
Setup Unleash server
After learning the concept, it’s time to set up an Unleash server.
API Server
There are many ways to get an Unleash API server - use their demo site, run on a cloud, or docker on the local machine. See this quick-start guide to run your server.
To run using Docker, run these commands.
# create a network
docker network create unleash

# run a postgres db
docker run -d \
  -e POSTGRES_USER=unleash_user \
  -e POSTGRES_PASSWORD=some_password \
  -e POSTGRES_DB=unleash \
  --network unleash \
  --name postgres \
  postgres

# run unleash api server
docker run -d \
  -p 4242:4242 \
  -e DATABASE_HOST=postgres \
  -e DATABASE_NAME=unleash \
  -e DATABASE_USERNAME=unleash_user \
  -e DATABASE_PASSWORD=some_password \
  -e DATABASE_SSL=false \
  -e INIT_CLIENT_API_TOKENS="default:development.unleash-insecure-api-token" \
  --network unleash \
  --name unleash \
  unleashorg/unleash-server
After the server runs successfully, open “http://localhost:4242” and enter the username and password below.
username: admin
password: unleash4all
Proxy Server
You can run a proxy server using docker or NodeJs application. In this tutorial, we need a NodeJs proxy because we will add a custom activation strategy later. See this guide to set up a proxy server.
Or you can clone this based repository and run using the commands below.
git clone https://github.com/pongsatt/unleash-proxy.git

cd unleash-proxy
npm i
npm start
Success looks like this.
> [email protected] start
> node index.js

Unleash Proxy listening on http://localhost:3000/proxy
Note
This proxy will connect to API server using a predefined token “default:development.unleash-insecure-api-token”. You can add new token as needed.
Create a feature toggle
Now, we’ve got the API server and proxy running. Next, we will create our demo feature.
On the admin UI, click the “New feature toggle” button.
Fill in the feature information and click the “Create feature” button.
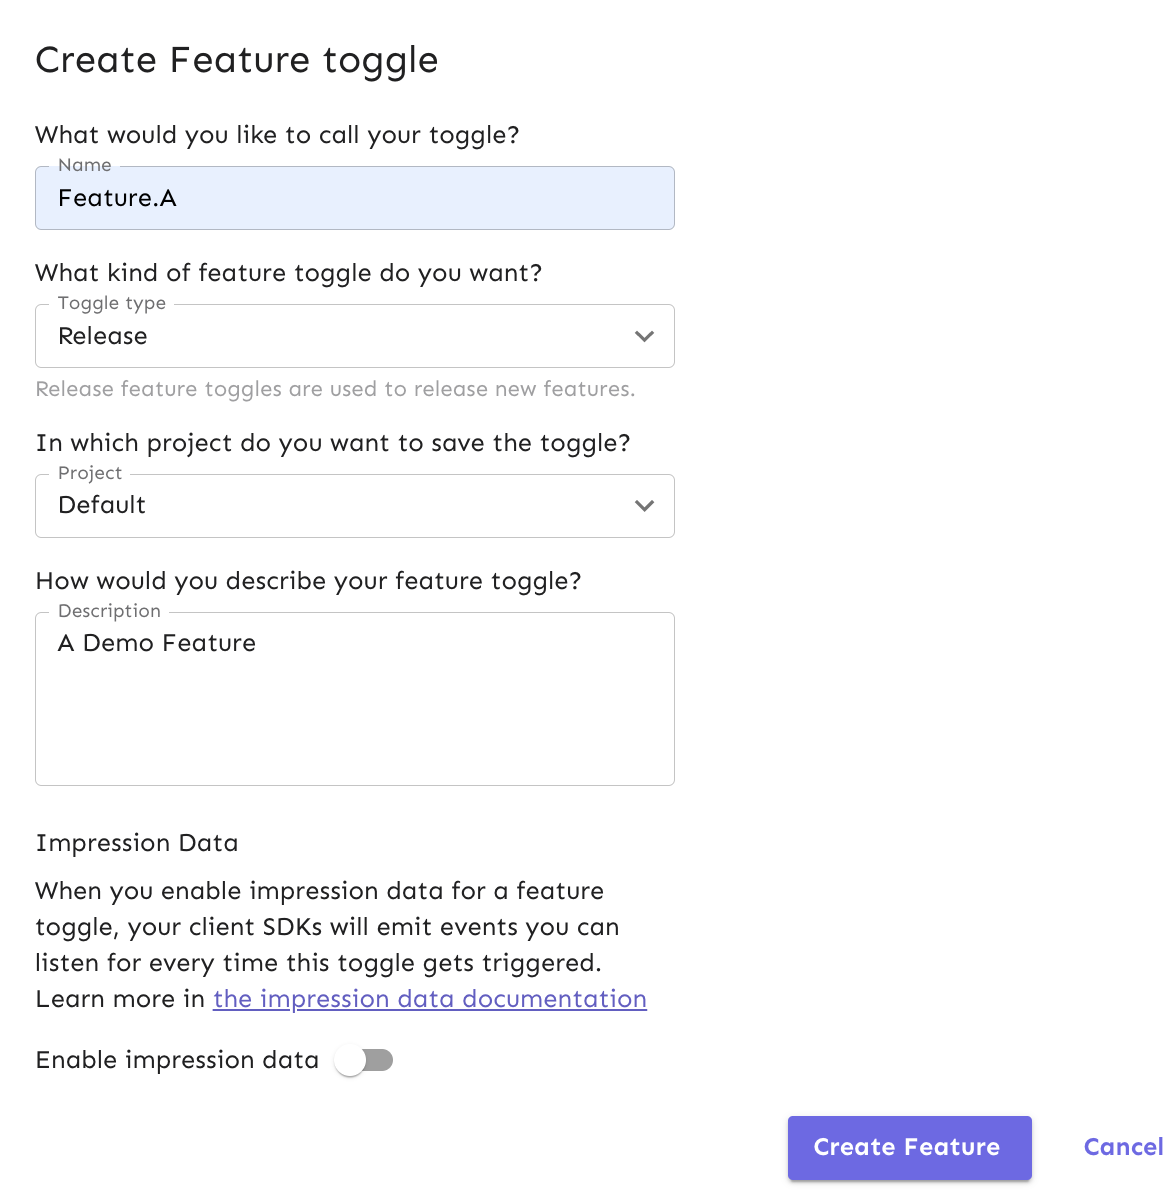 Feature information
Add a “Standard” strategy for the “development” environment by clicking the “Add strategy” button.
 Add standard strategy
Click the “Save strategy” button.
Enable “development environment”.
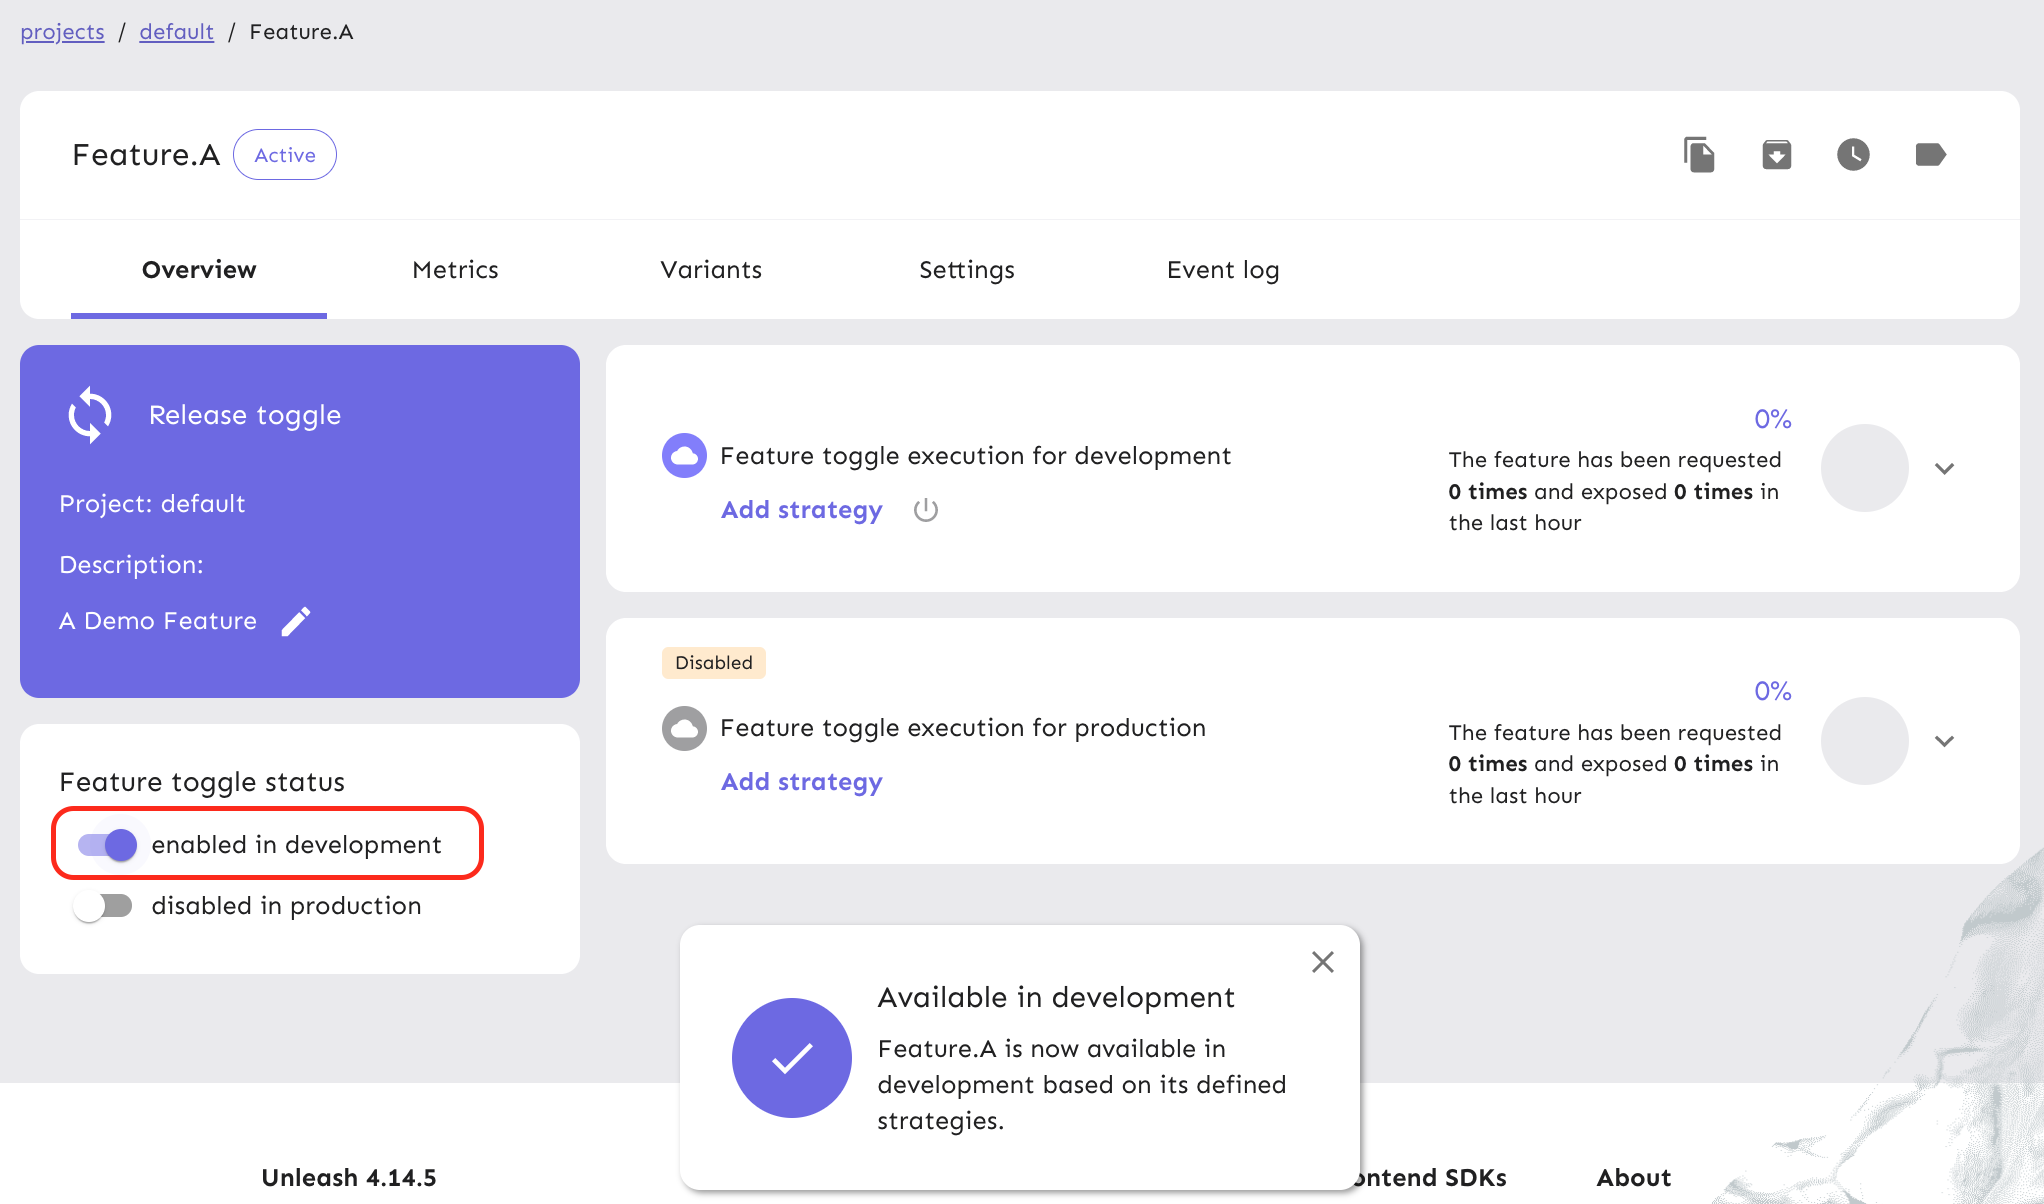 Enable development environment
This feature is ready for the world!!.
Create a ReactJS demo application
You can create a react app from scratch or use the below repository as a starting point.
To get a pre-made project.
git clone https://github.com/pongsatt/unleash-react-demo.git

cd unleash-react-demo
npm i
PORT=3001 npm start
Note
We run the application in port 3001 to avoid conflict with the proxy server.
To start from scratch.
Create a new application using create-react-app.
npx create-react-app unleash-react-demo --template typescript

# https://create-react-app.dev/docs/adding-typescript/

cd unleash-react-demo
PORT=3001 npm start
Install unleash ReactJs SDK.
npm install @unleash/proxy-client-react unleash-proxy-client
Update “index.tsx”.
import FlagProvider from '@unleash/proxy-client-react';
import ReactDOM from 'react-dom/client';
import App from './App';
import './index.css';

const config = {
  url: 'http://localhost:3000/proxy',
  clientKey: 'clientKey1',
  refreshInterval: 5,
  appName: 'MyReactApp'
};

const root = ReactDOM.createRoot(
  document.getElementById('root') as HTMLElement
);
root.render(
  <FlagProvider config={config}>
    <App />
  </FlagProvider>
);
Note
- We add FlagProvider and point to our proxy url.
- clientKey: this is the key defined in our proxy.
- refreshInterval: how long should we refresh toggle data from the proxy.
Add 2 new components.
“MyButton.tsx”.
export default function MyButton() {
    return (
        <button style={{
            border: 'none',
            color: 'black',
            padding: '15px 32px',
            textAlign: 'center',
            textDecoration: 'none',
            display: 'inline-block',
            fontSize: '16px',
            margin: '4px 2px',
            cursor: 'pointer',
        }} >Button</button >
    );
}
“MainComponent.tsx”.
import { useFlag } from "@unleash/proxy-client-react";
import MyButton from "./MyButton";

export default function MainComponent() {
    const featureAEnabled = useFlag('Feature.A');

    return (
        <div style={{ textAlign: 'center' }}>
            <h3>Unleash ReactJs Demo</h3>
            {featureAEnabled && <MyButton />}
        </div>
    );
}
Note
In MainComponent, we query our feature “Feature.A”. If it’s toggle “on”, “MyButton” will display.
Update “App.tsx”.
import MainComponent from './MainComponent';

function App() {
  return (
    <div className="App">
      <MainComponent />
    </div>
  );
}

export default App;
At this point, if everything is fine, our application should look like this.
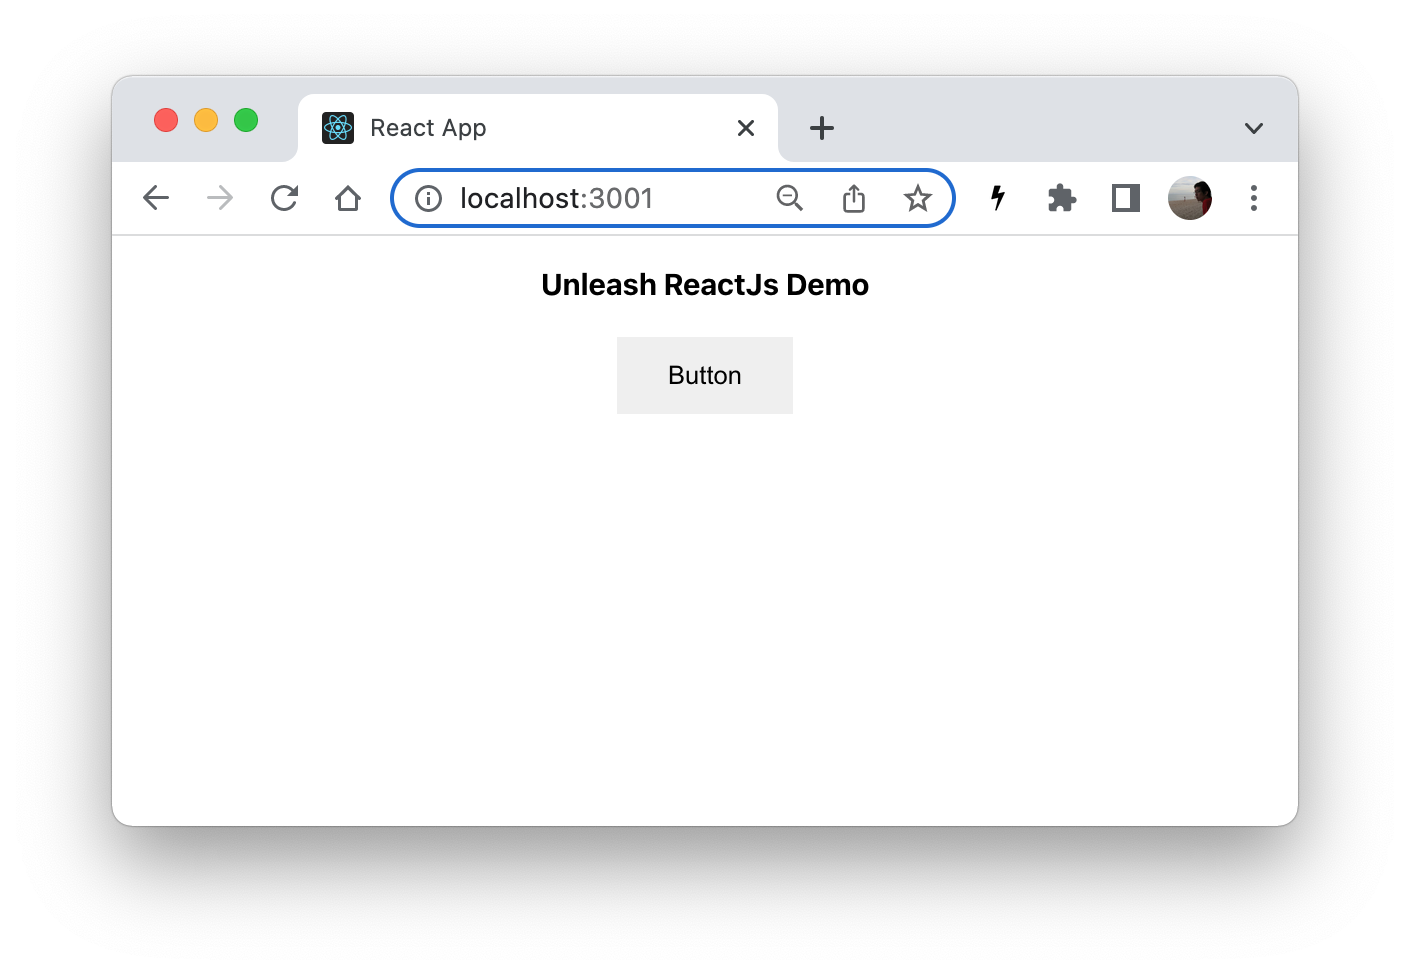 Application UI shows “Feature.A” toggled on
If we remove the strategy or disable our environment, the button should disappear.
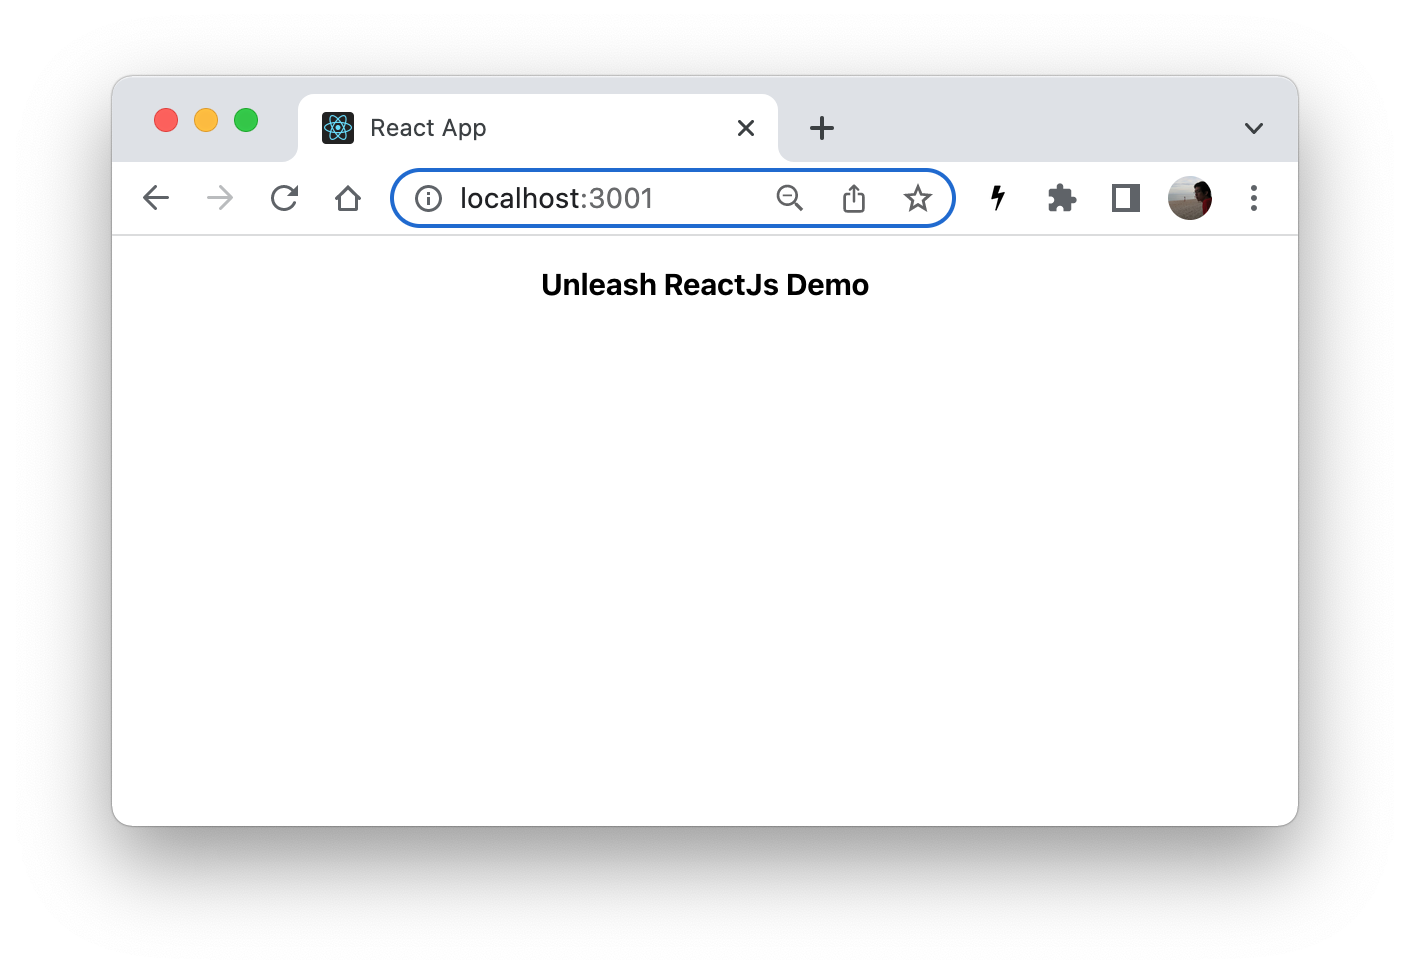 Application UI shows “Feature.A” toggled off
Run an A/B testing
We are ready to run our experiment. In this experiment, we will add 2 variants for the button, “green” and “blue”. 50% of users will see the “green” button and 50% will see the “blue” button.
Setup variants
On “Feature.A” in admin UI, click on the “Variants” tab, then click the “New variant” button.
Fill in the information for “green” and “blue” and click the “Save” button.
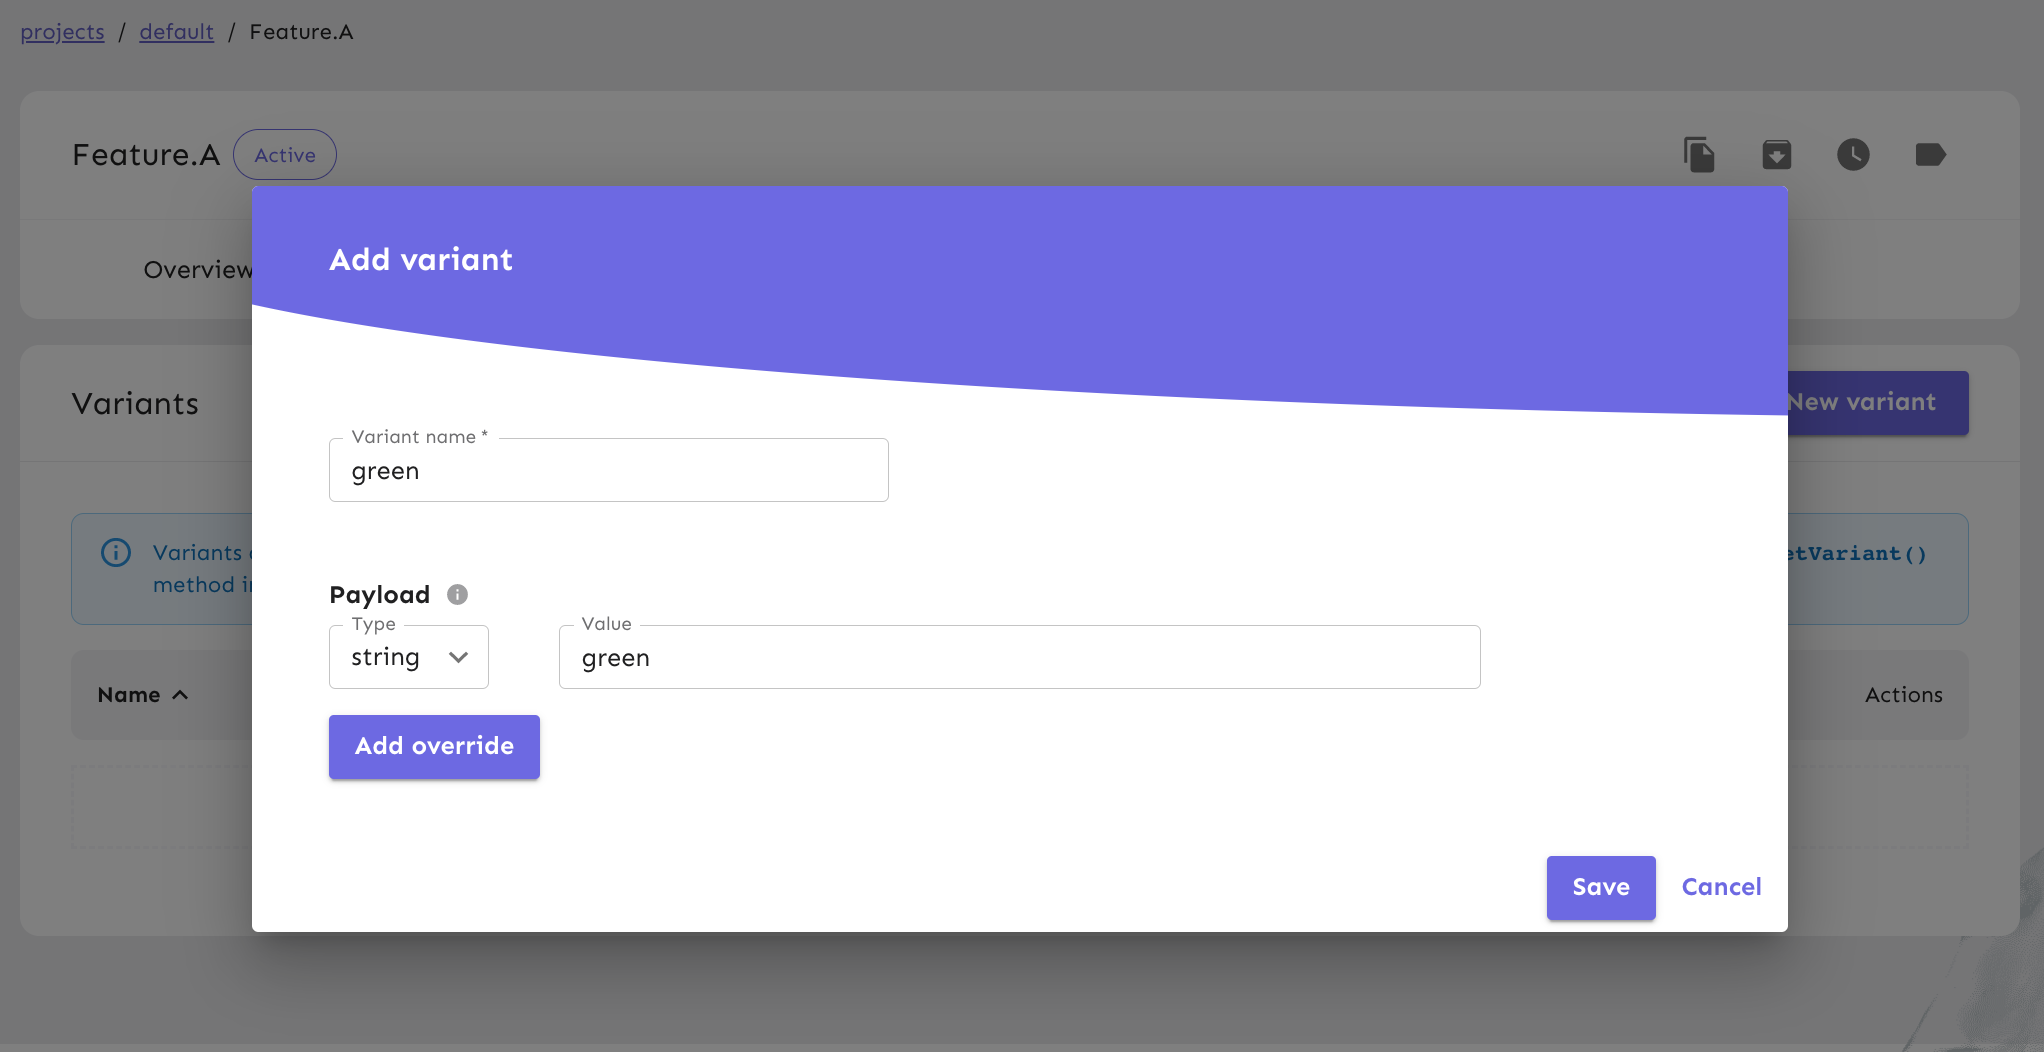 Add a new variant screen
 All variants
Update react application to support variant.
Update “MyButton.tsx” to accept color as a property.
export default function MyButton(props: { color?: string }) {
    return (
        <button style={{
            border: 'none',
            color: 'black',
            padding: '15px 32px',
            textAlign: 'center',
            textDecoration: 'none',
            display: 'inline-block',
            fontSize: '16px',
            margin: '4px 2px',
            cursor: 'pointer',
            backgroundColor: props.color ?? ''
        }} >Button</button >
    );
}
Update “MainComponent.tsx” to query variant and pass value to “MyButton”.
import { useFlag, useVariant } from "@unleash/proxy-client-react";
import MyButton from "./MyButton";

export default function MainComponent() {
    const featureAVariant = useVariant('Feature.A');

    return (
        <div style={{ textAlign: 'center' }}>
            <h3>Unleash ReactJs Demo</h3>
            {featureAVariant.enabled && <MyButton color={featureAVariant.payload?.value} />}
        </div>
    );
}
Refresh the application UI again and you should see the button in either “blue” or “green”.
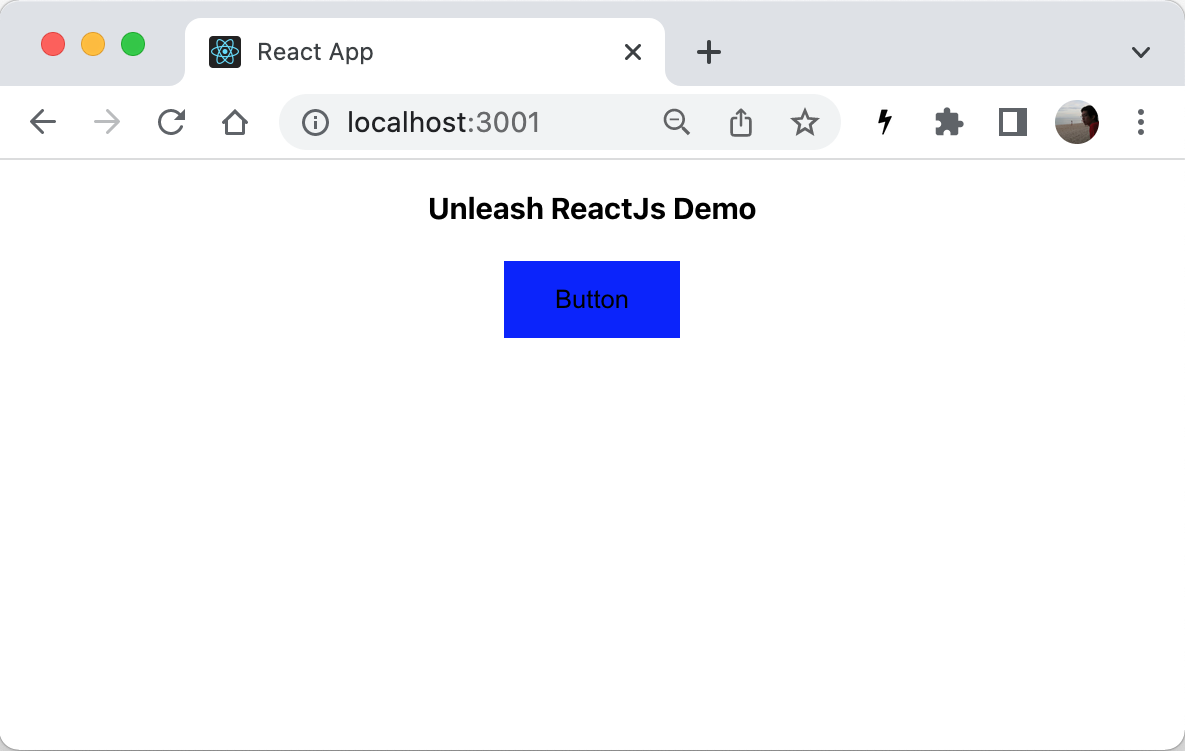 Blue variant
To see the other variant, open the application UI in “Cognito mode” and you should see roughly 50% green or blue button.
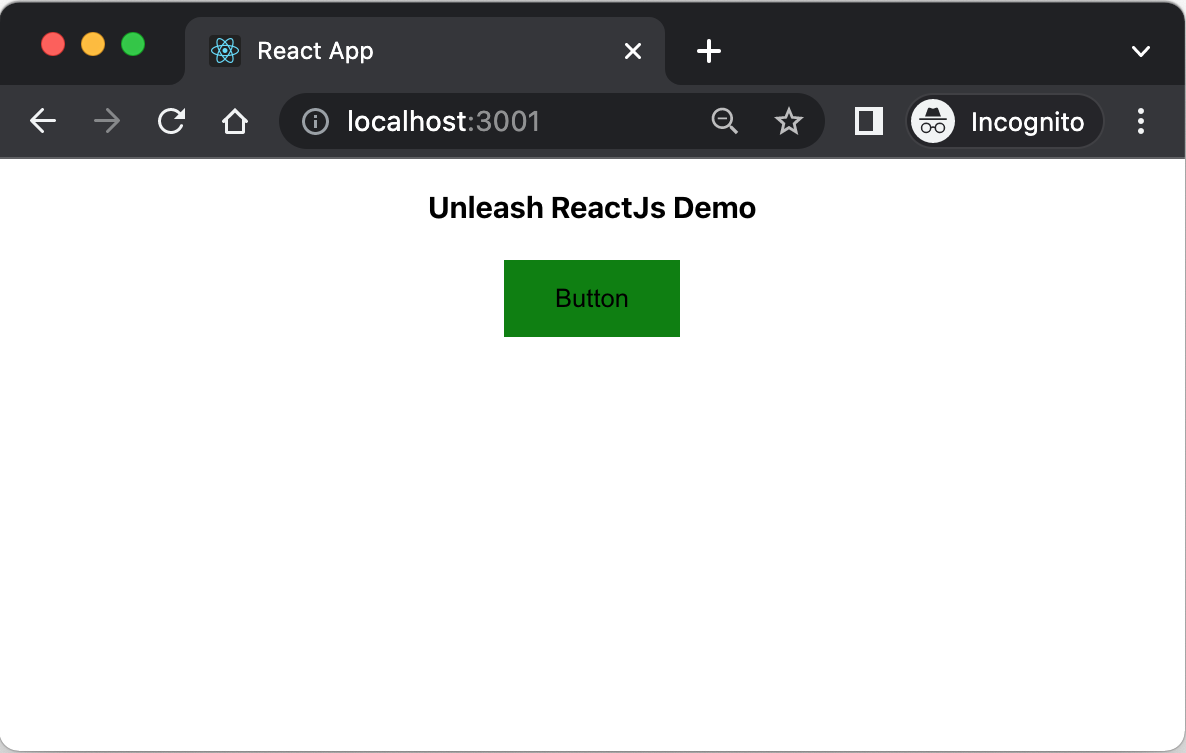 Green variant
Note
We need to open “Cognito mode” because the default behavior is “Sticky” which mean a user with the same sessionId will always see the same variant (to avoid user’s confusion).
Conclusion
Progressive delivery is the future of software development. Feature toggle can help us to deliver software faster by pushing the code to the main branch and exposing the feature when it’s ready. A/B Testing enables us to experiment with the features and get valuable feedback from the users.
Unleash is one of many open source software that brings Progressive delivery to the hands of developers. Make it faster for us to adopt feature toggles and A/B testing.
This tutorial showed you how to build an application with a simple feature toggle and A/B testing.
Next, I will show you how to create a custom activation strategy to gradually toggle features for the specific region using Unleash open source version. Implement Progressive delivery with Unleash and ReactJs - Custom Activation Strategy.
You can see the complete code here.